Unity LevelPlay
This guide will instruct you step-by-step on how to set Chartboost live as an Ad Network on Unity LevelPlay mediation.
Platform Integration 🔗
Integrate LevelPlay mediation SDK and Chartboost LevelPlay SDK adapter by following LevelPlay official guide:
Supported integrations and ad formats 🔗
The Unity LevelPlay SDK exposes the native Chartboost SDK so you can access all native Chartboost interstitial, rewarded, and banner methods outside of the Unity LevelPlay SDK.
| Feature | Supported |
|---|---|
| Integration | |
| Bidding | ✓ |
| Waterfall | ✓ |
| Formats | |
| Banner | ✓ |
| Interstitial | ✓ |
| Rewarded | ✓ |
Step 1: Set up configurations in Chartboost UI 🔗
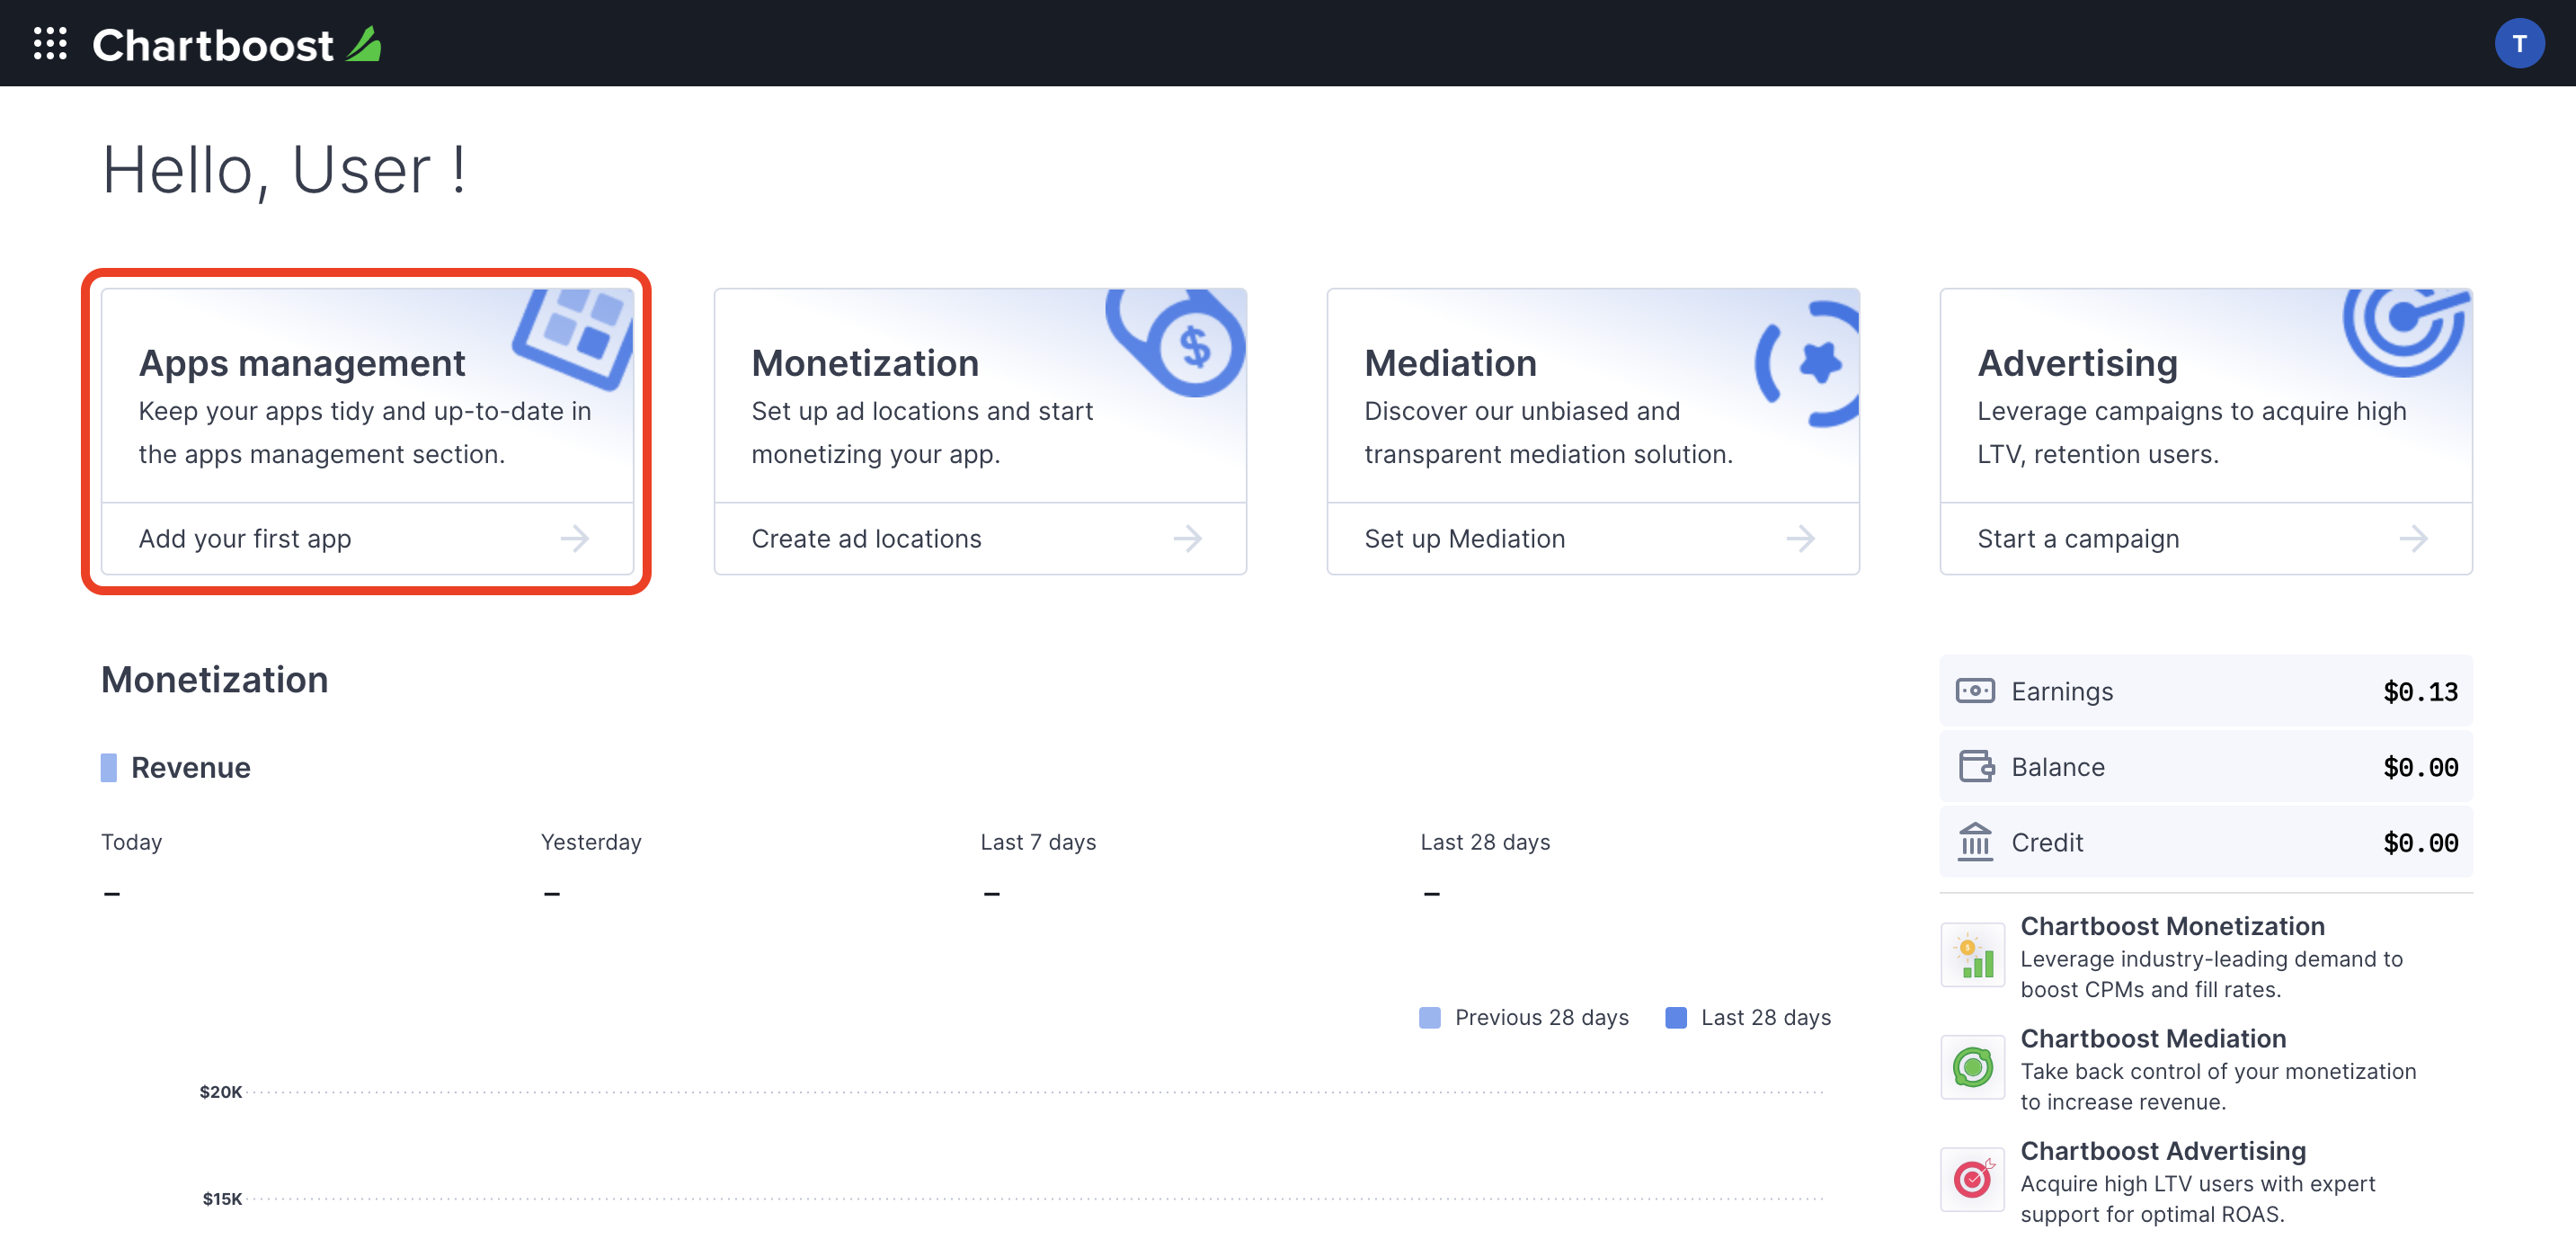
Sign up for a Chartboost account and log in once your account is verified. Then, navigate to the Apps management tab.
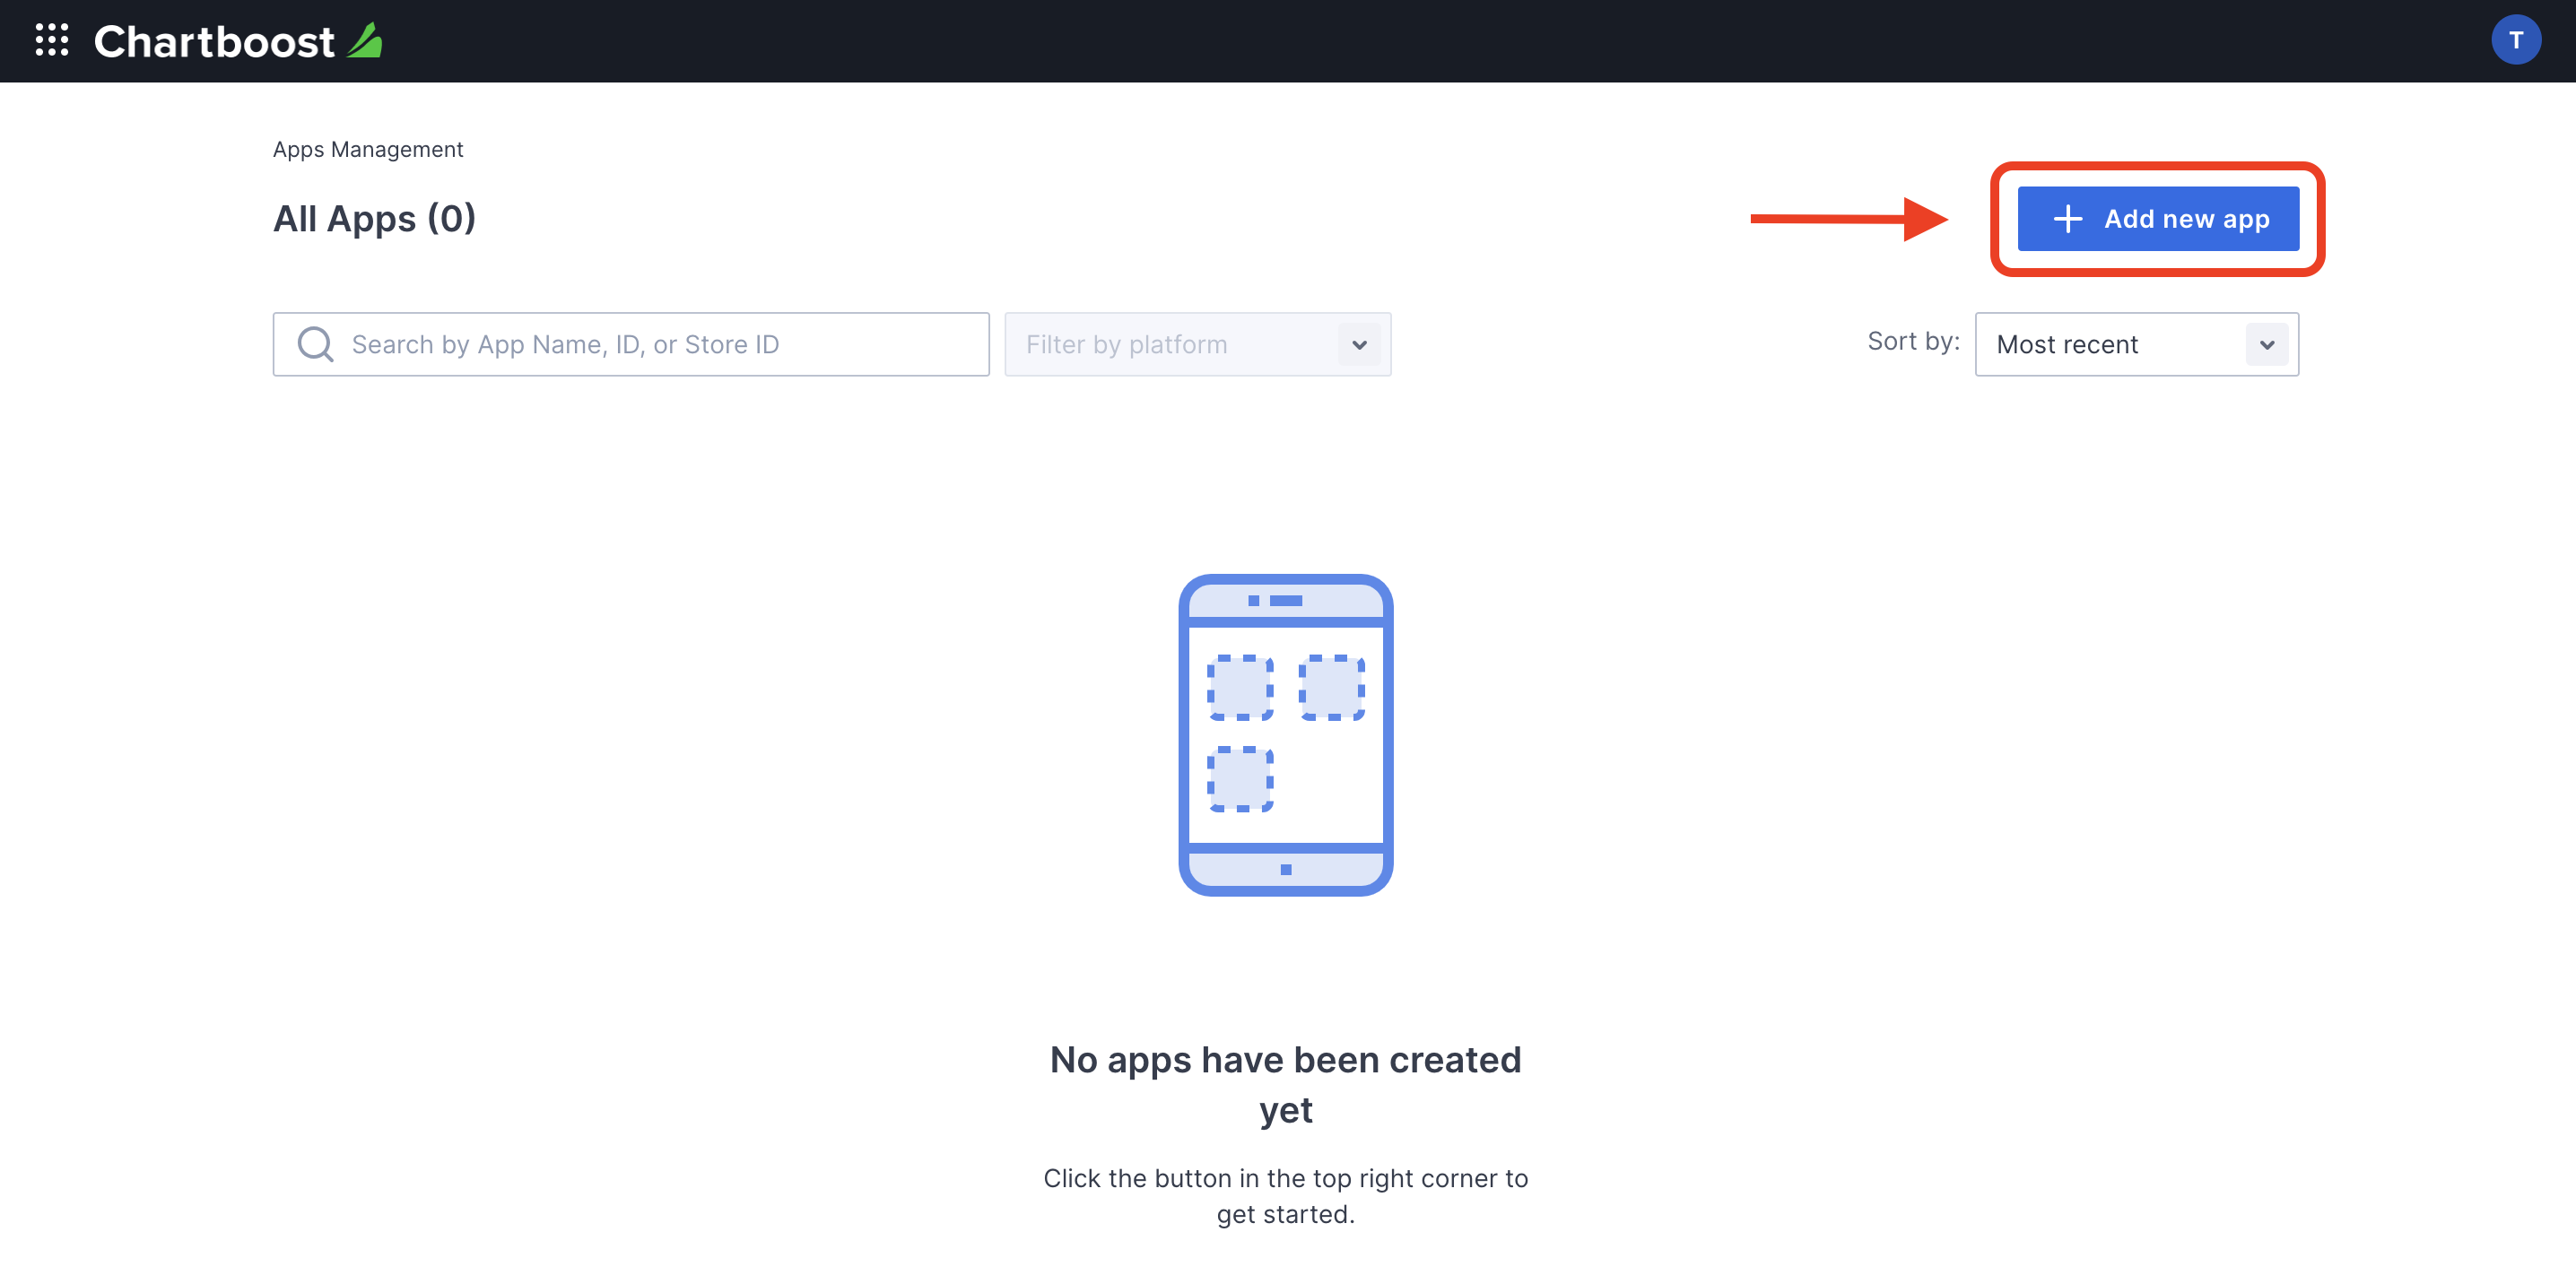
Click the Add new app button to create your app. For details, see Adding Apps.
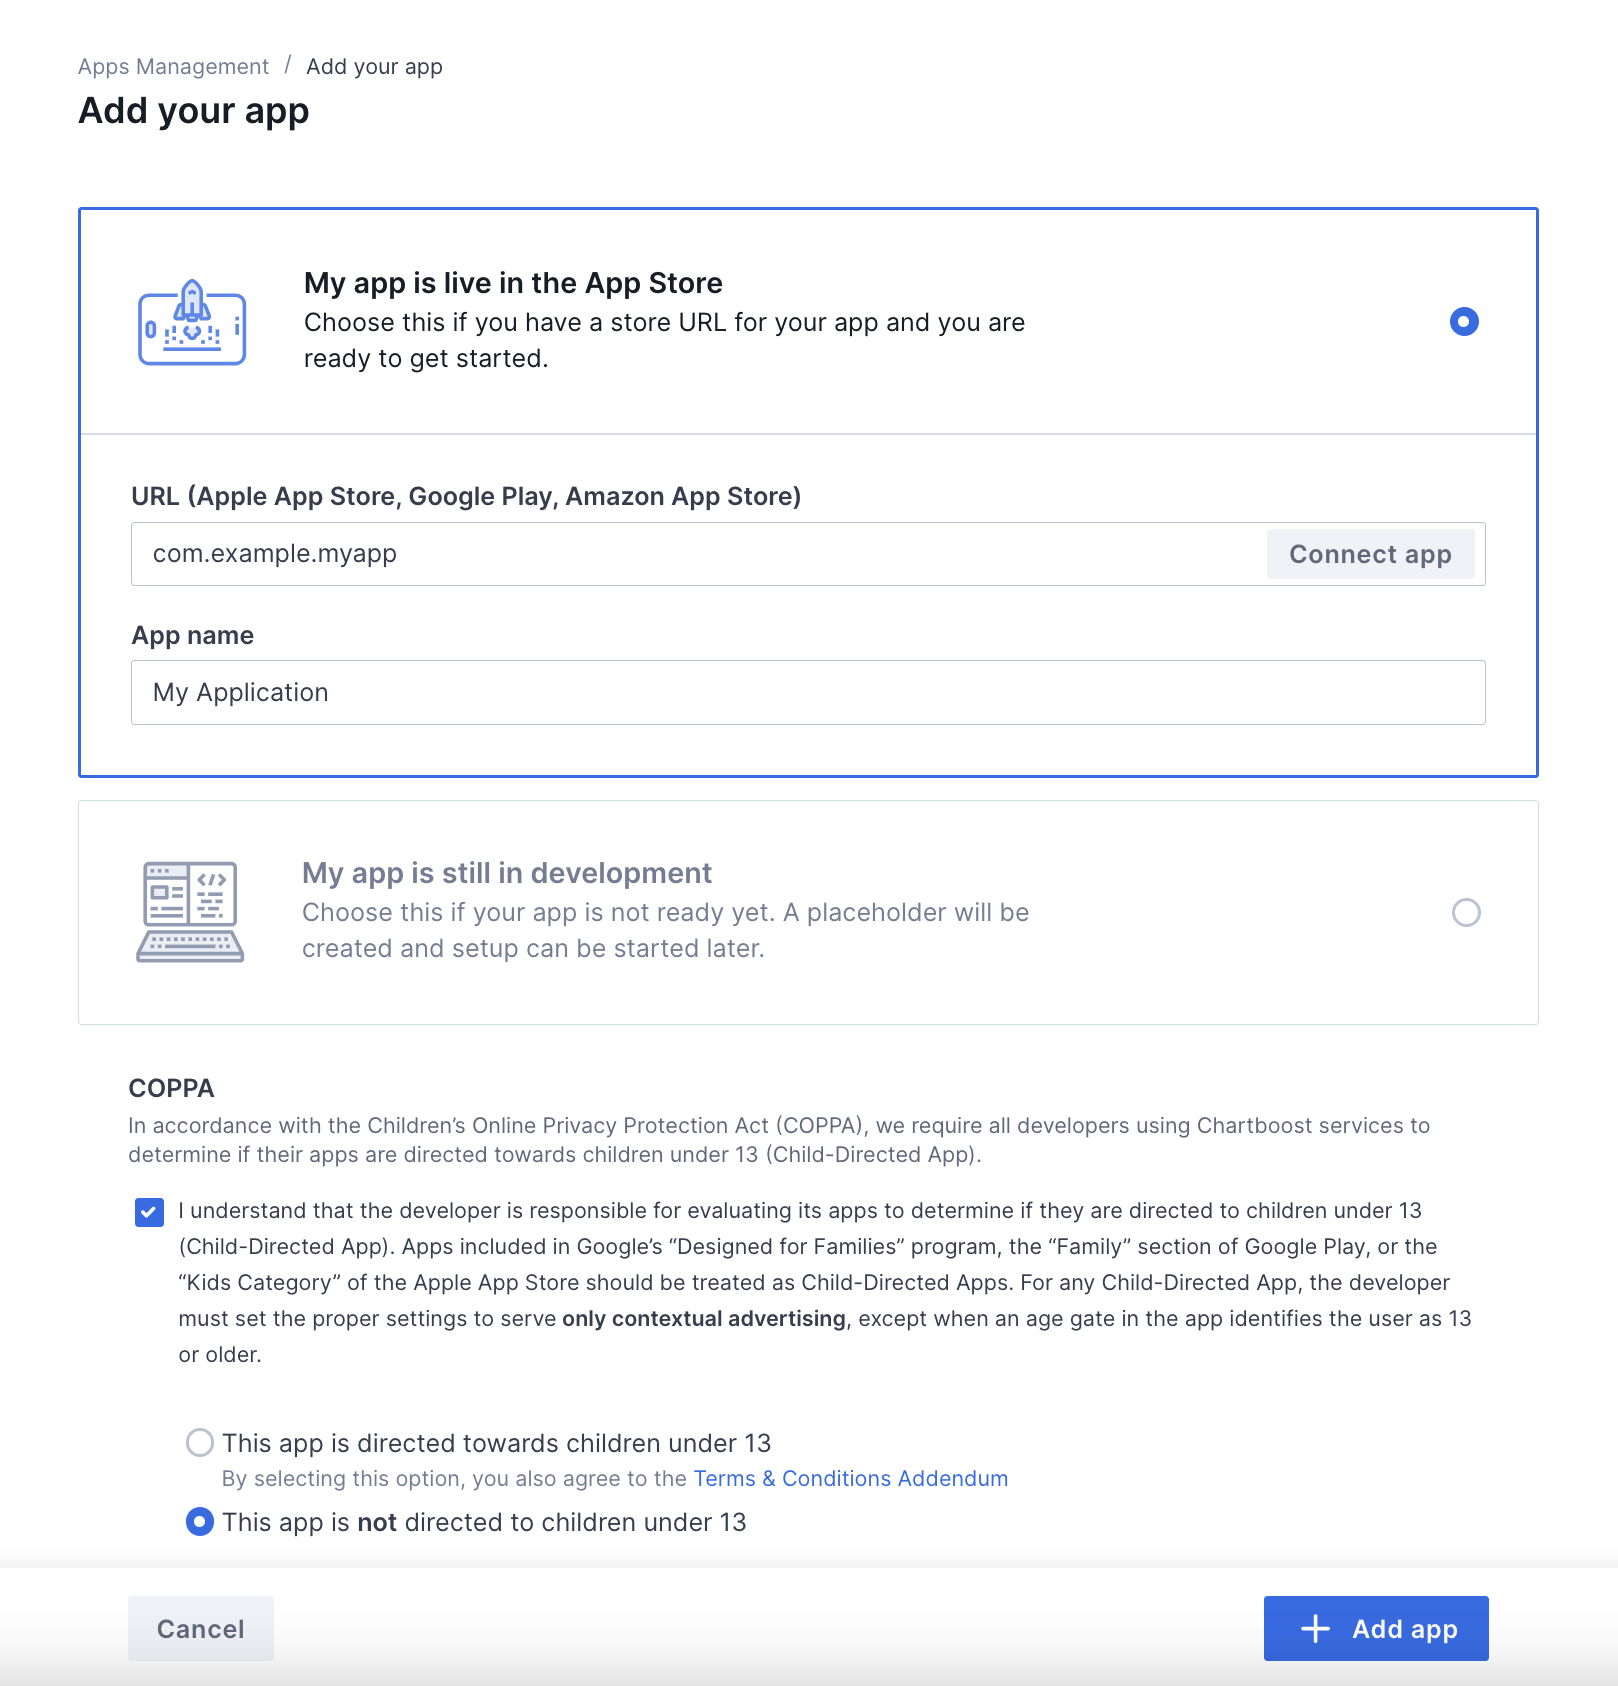
Fill out the rest of the form and click the Add App button to finalize your app.
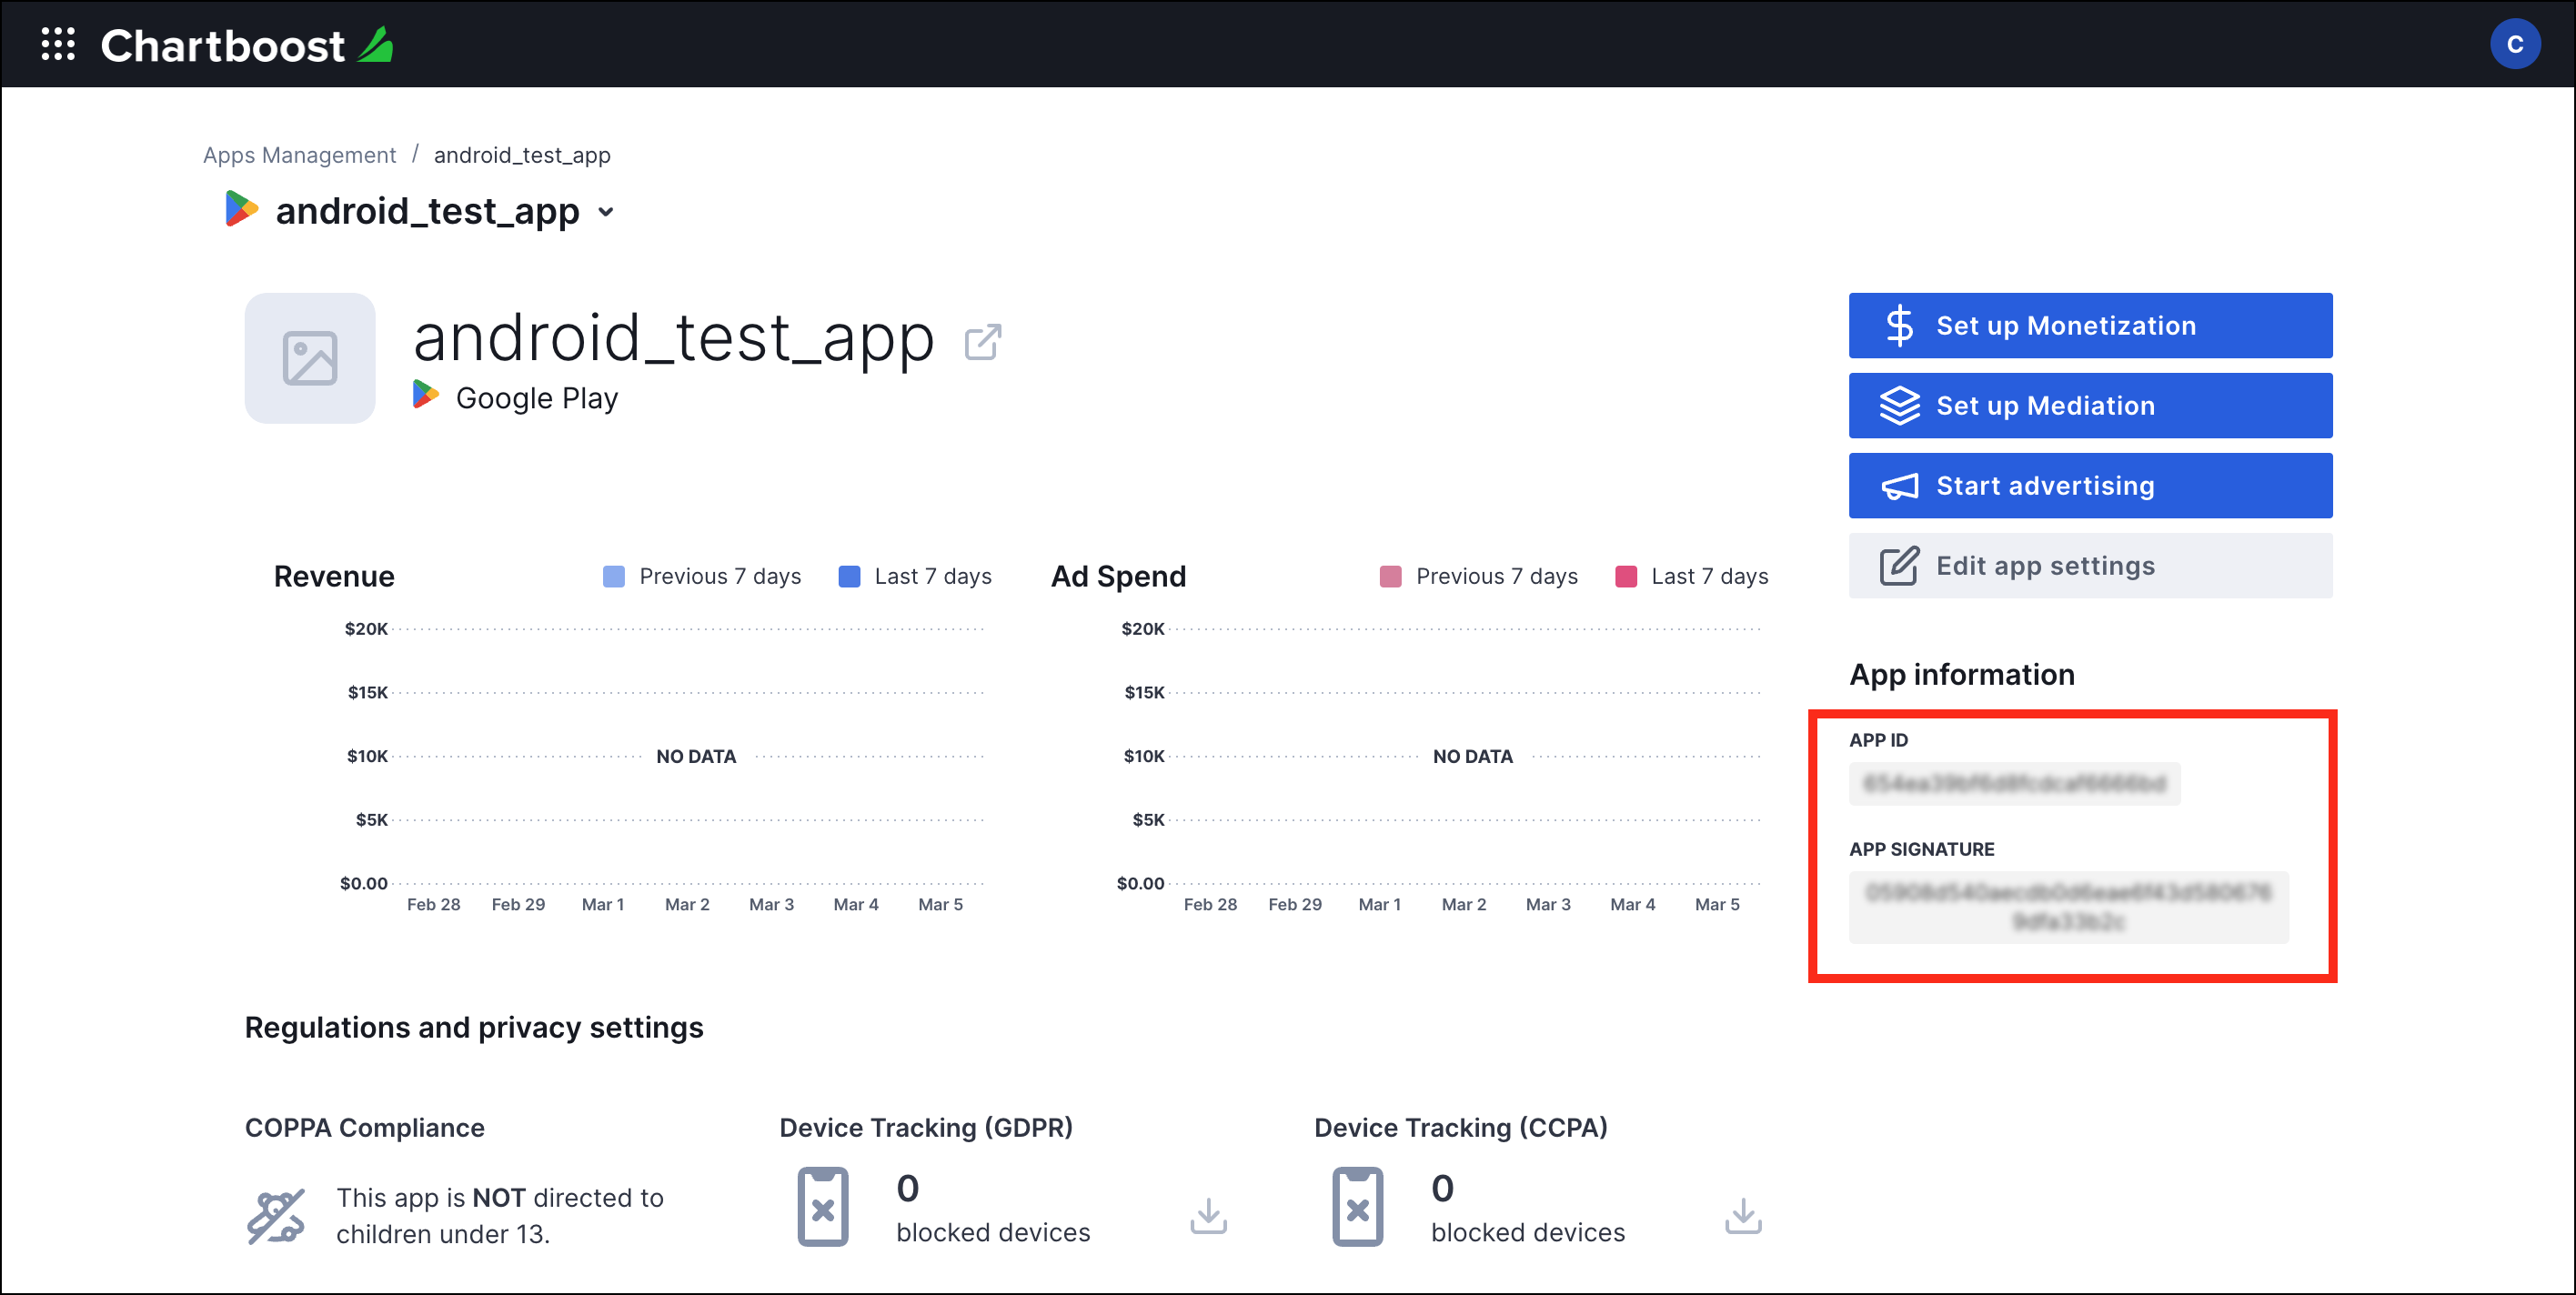
After your app is created, you will be directed to its dashboard. Take note of the App ID and App Signature of your app.
Ensure your app successfully passes the Publisher App Review.
Step 2: Activate Chartboost SDK network within Unity LevelPlay dashboard 🔗
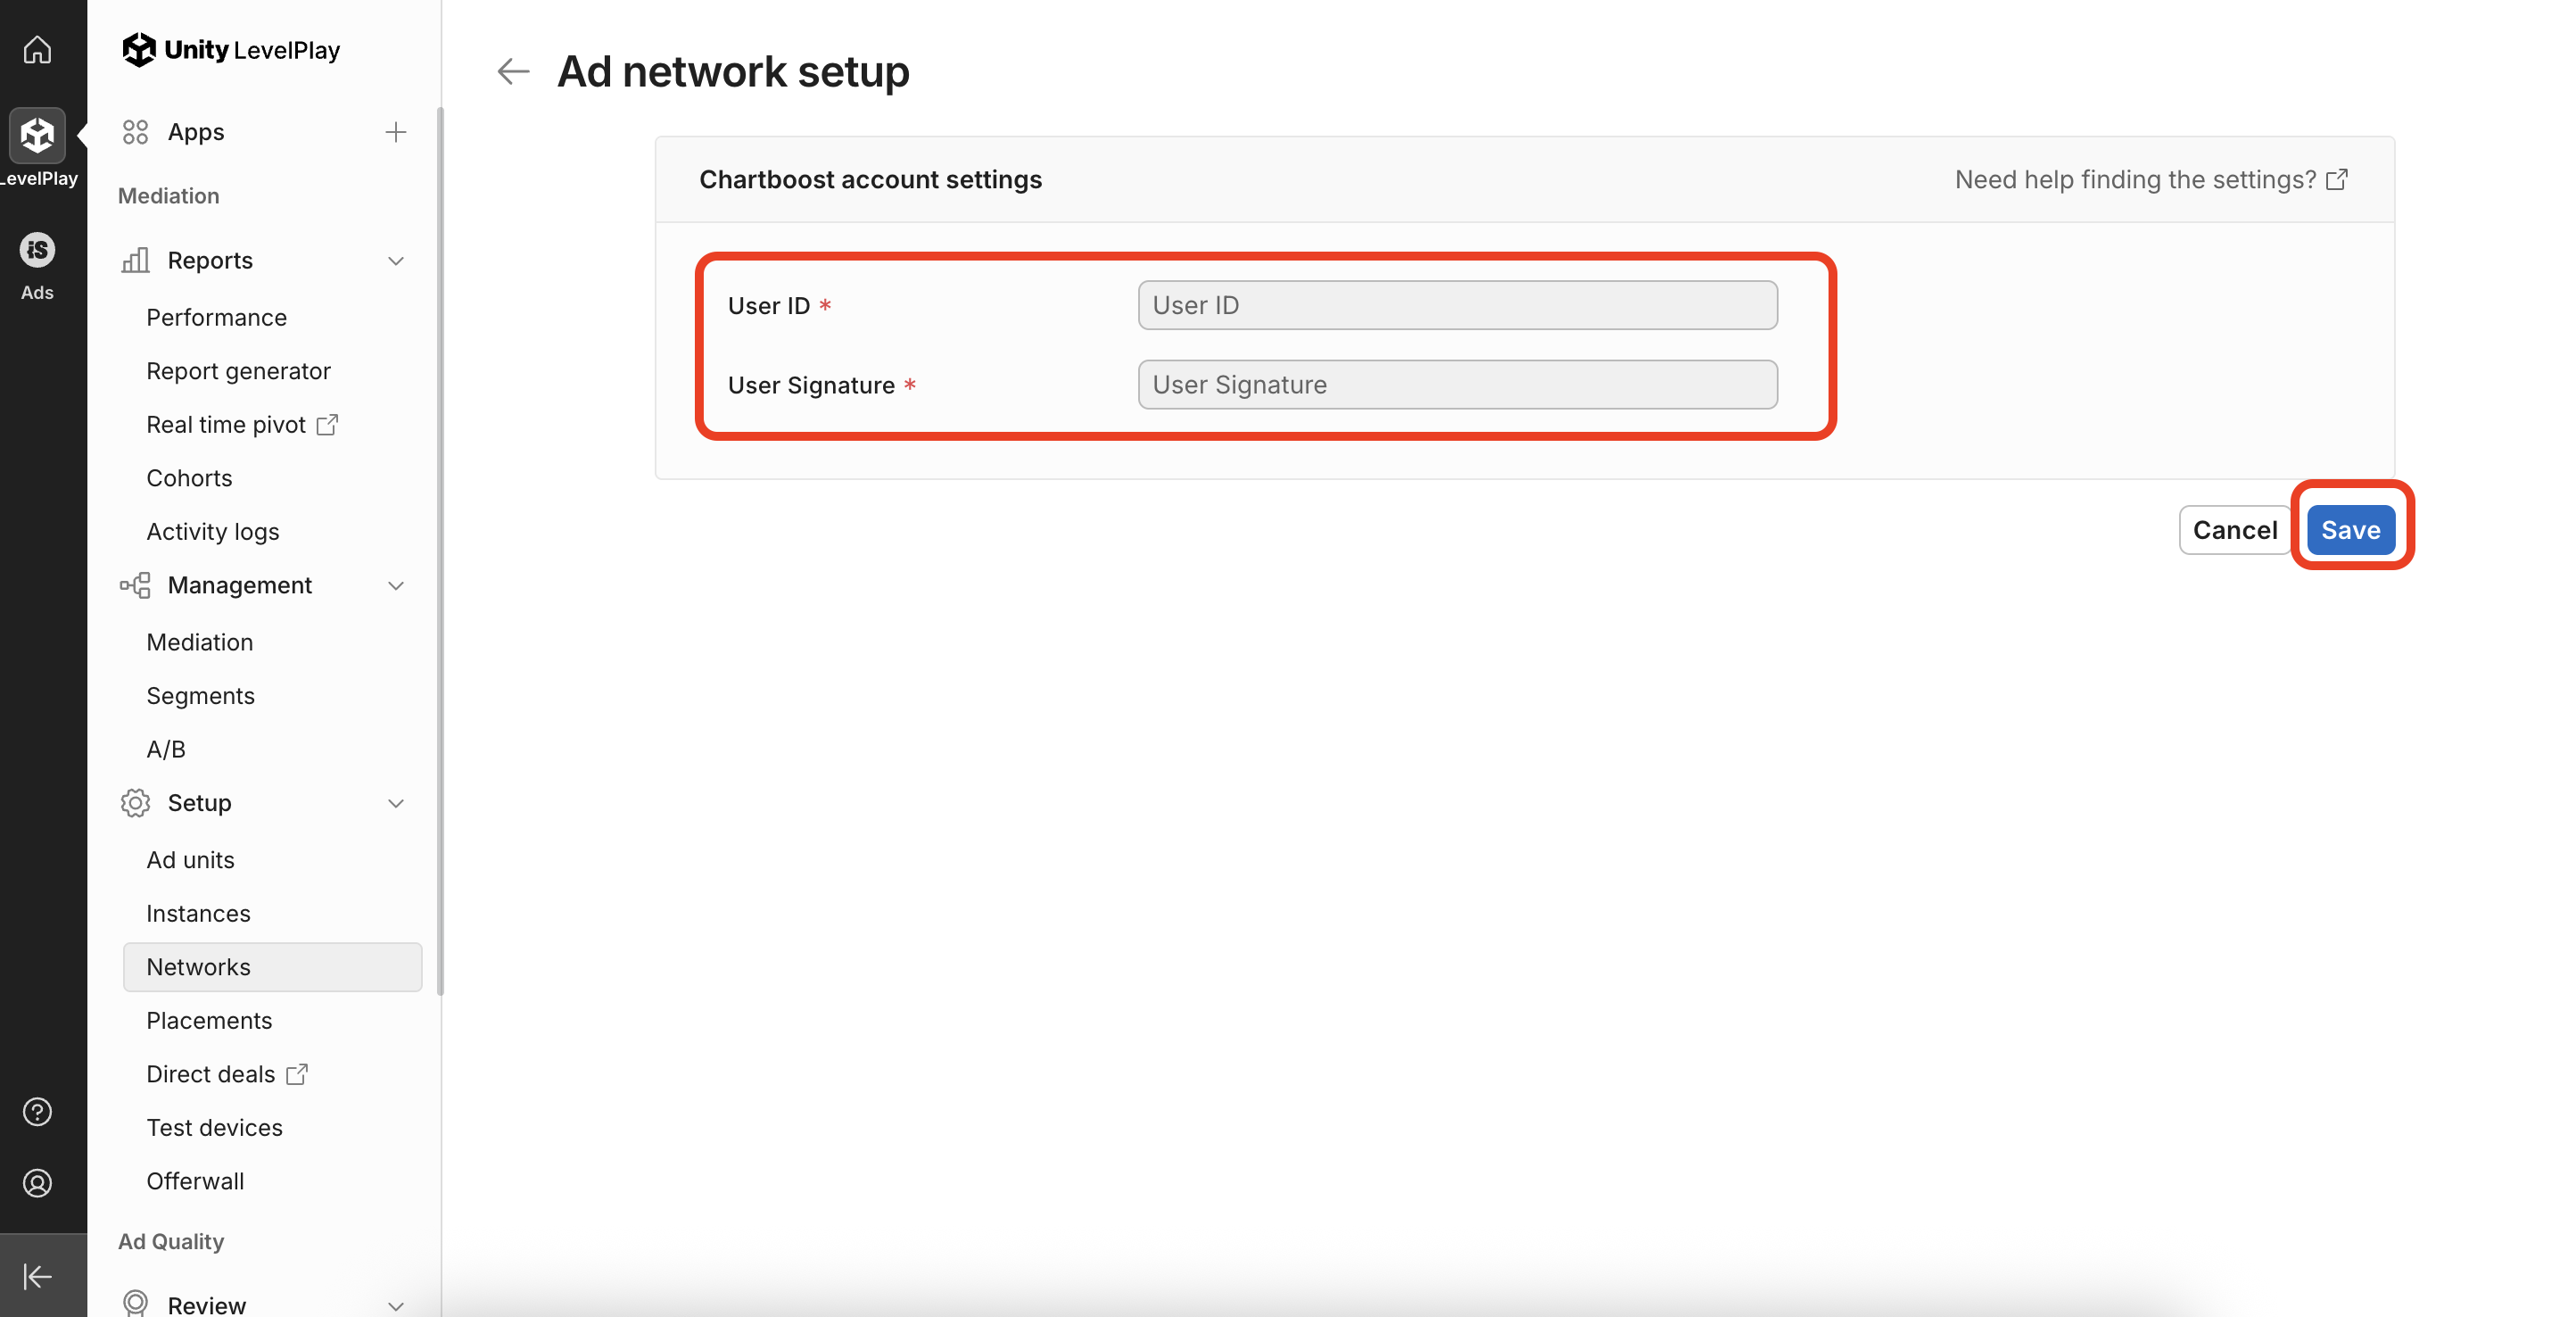
If Chartboost is not yet active on your LevelPlay account, navigate to Unity LevelPlay dashboard > Setup > Networks, find Chartboost, and click Setup.
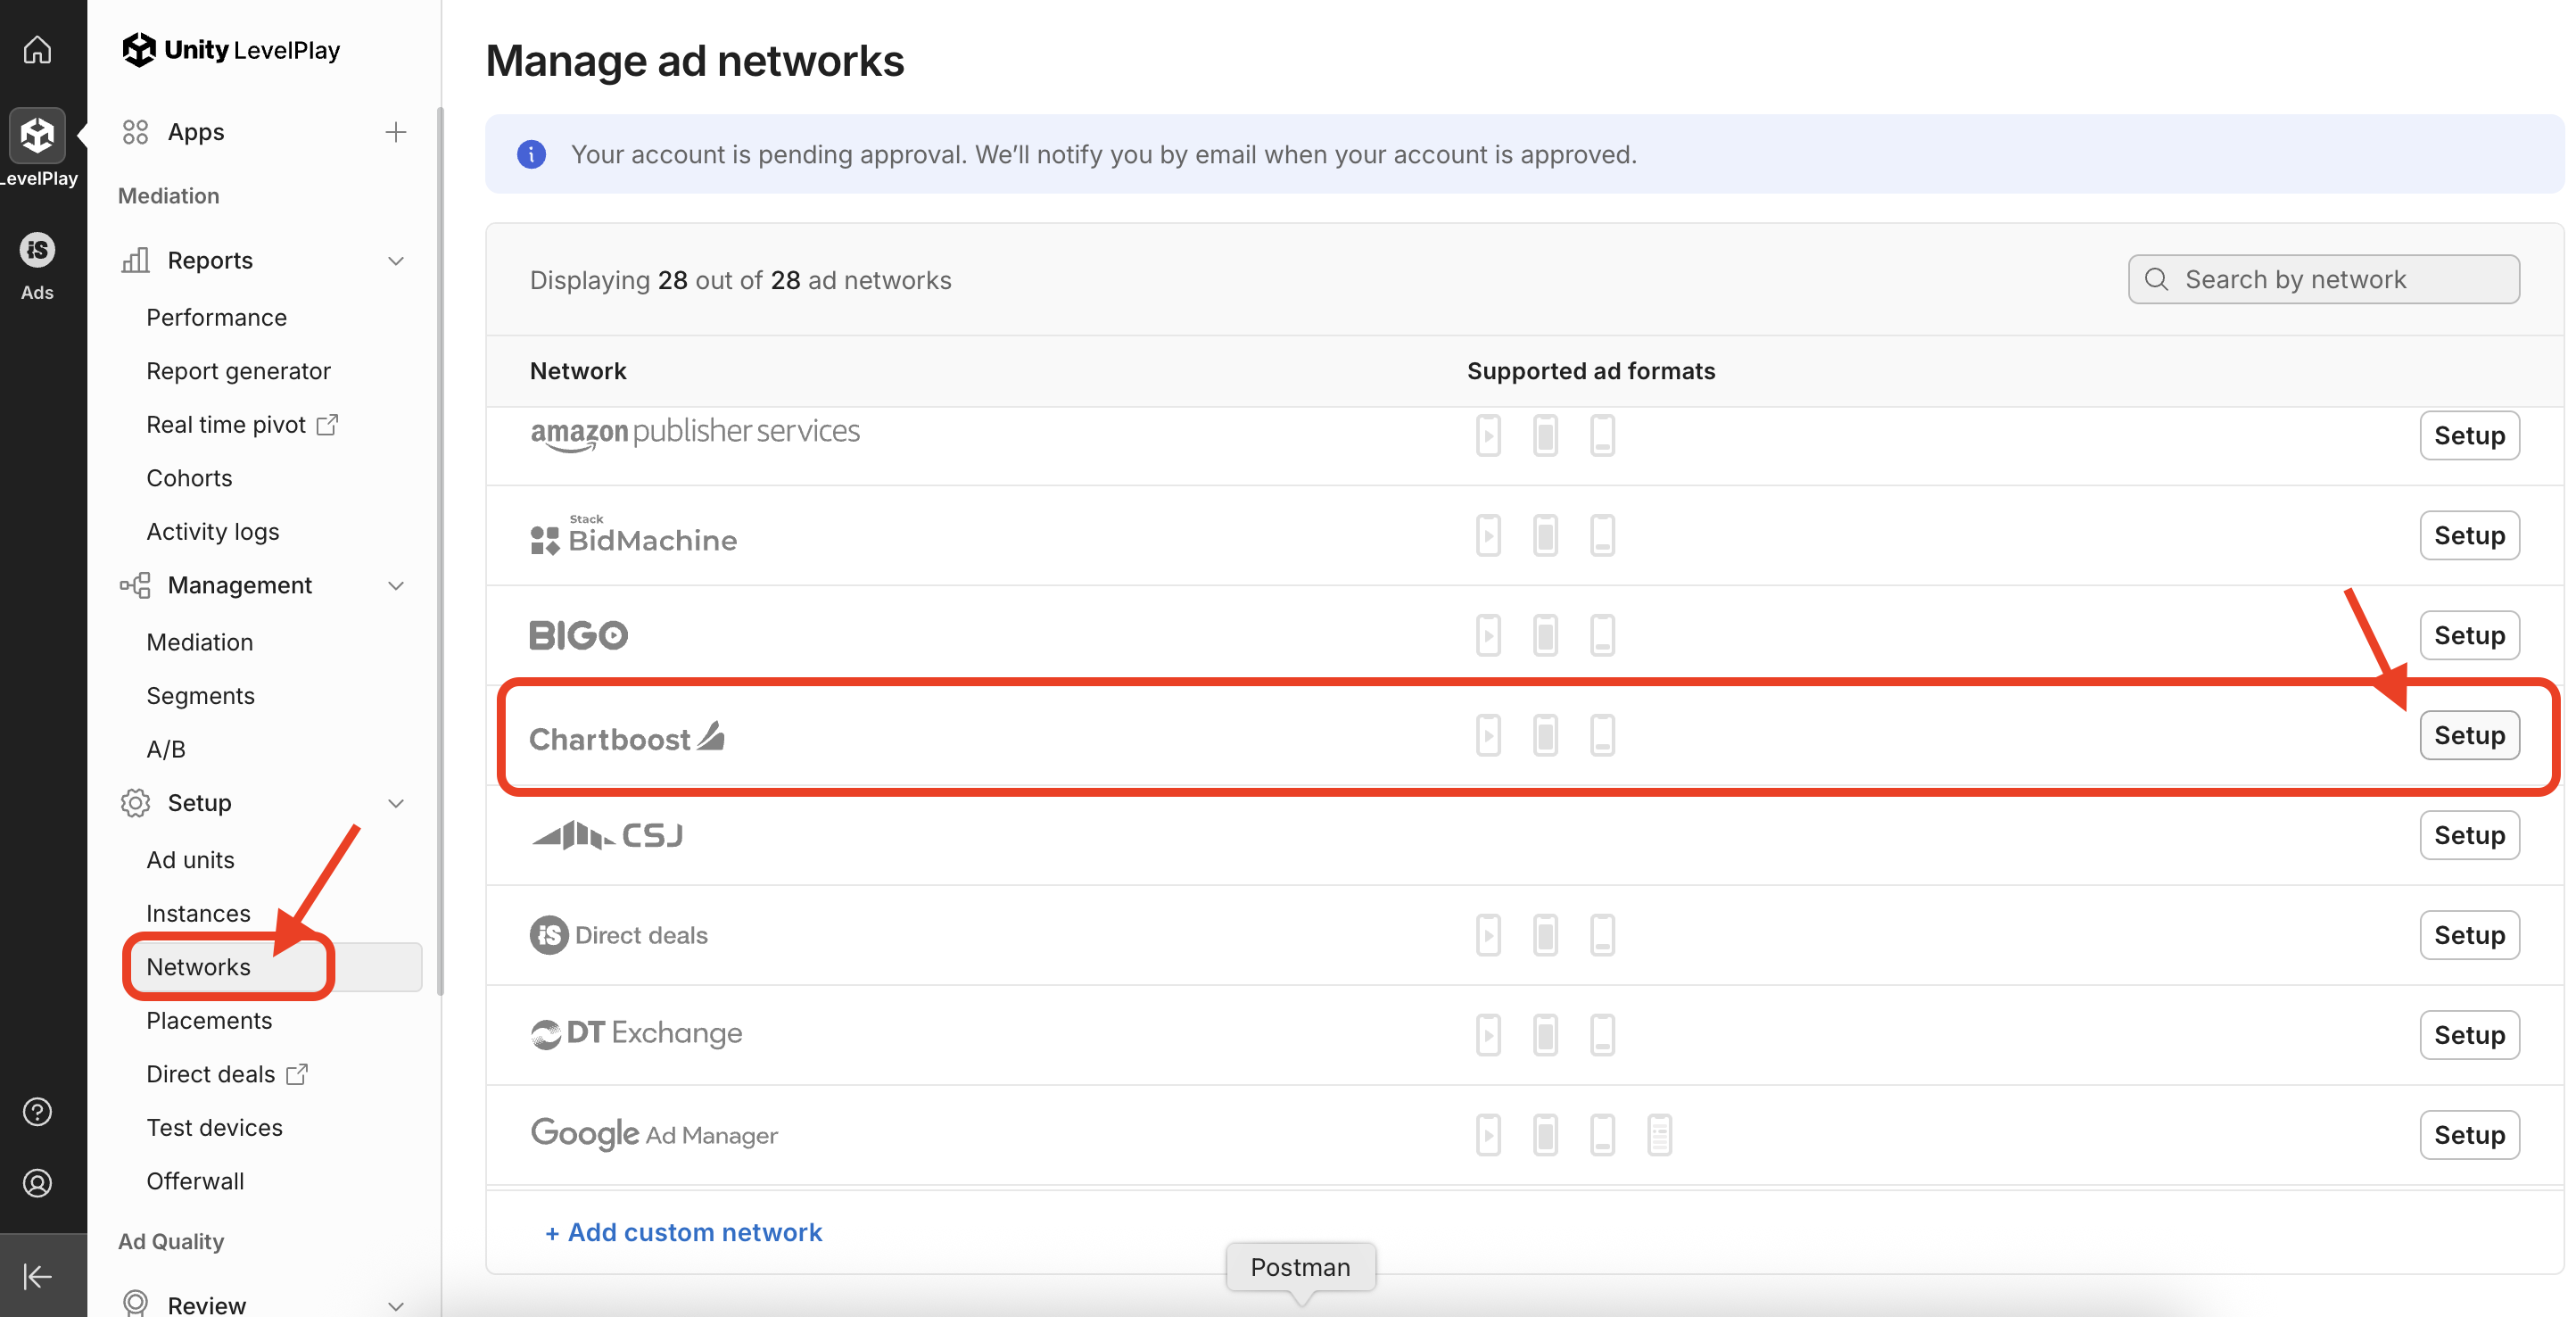
Input your Chartboost User ID and User Signature. Learn how to find them here. Click “Save”.
Step 3: Set up Chartboost Bidding and/or Waterfall locations on Chartboost dashboard and Unity LevelPlay dashboard 🔗
Unity LevelPlay supports both Chartboost Bidding and Chartboost Waterfall. Follow the guides below to set up Chartboost instances for your preferred mode:
How to set up Chartboost Bidding Instances in Unity LevelPlay 🔗
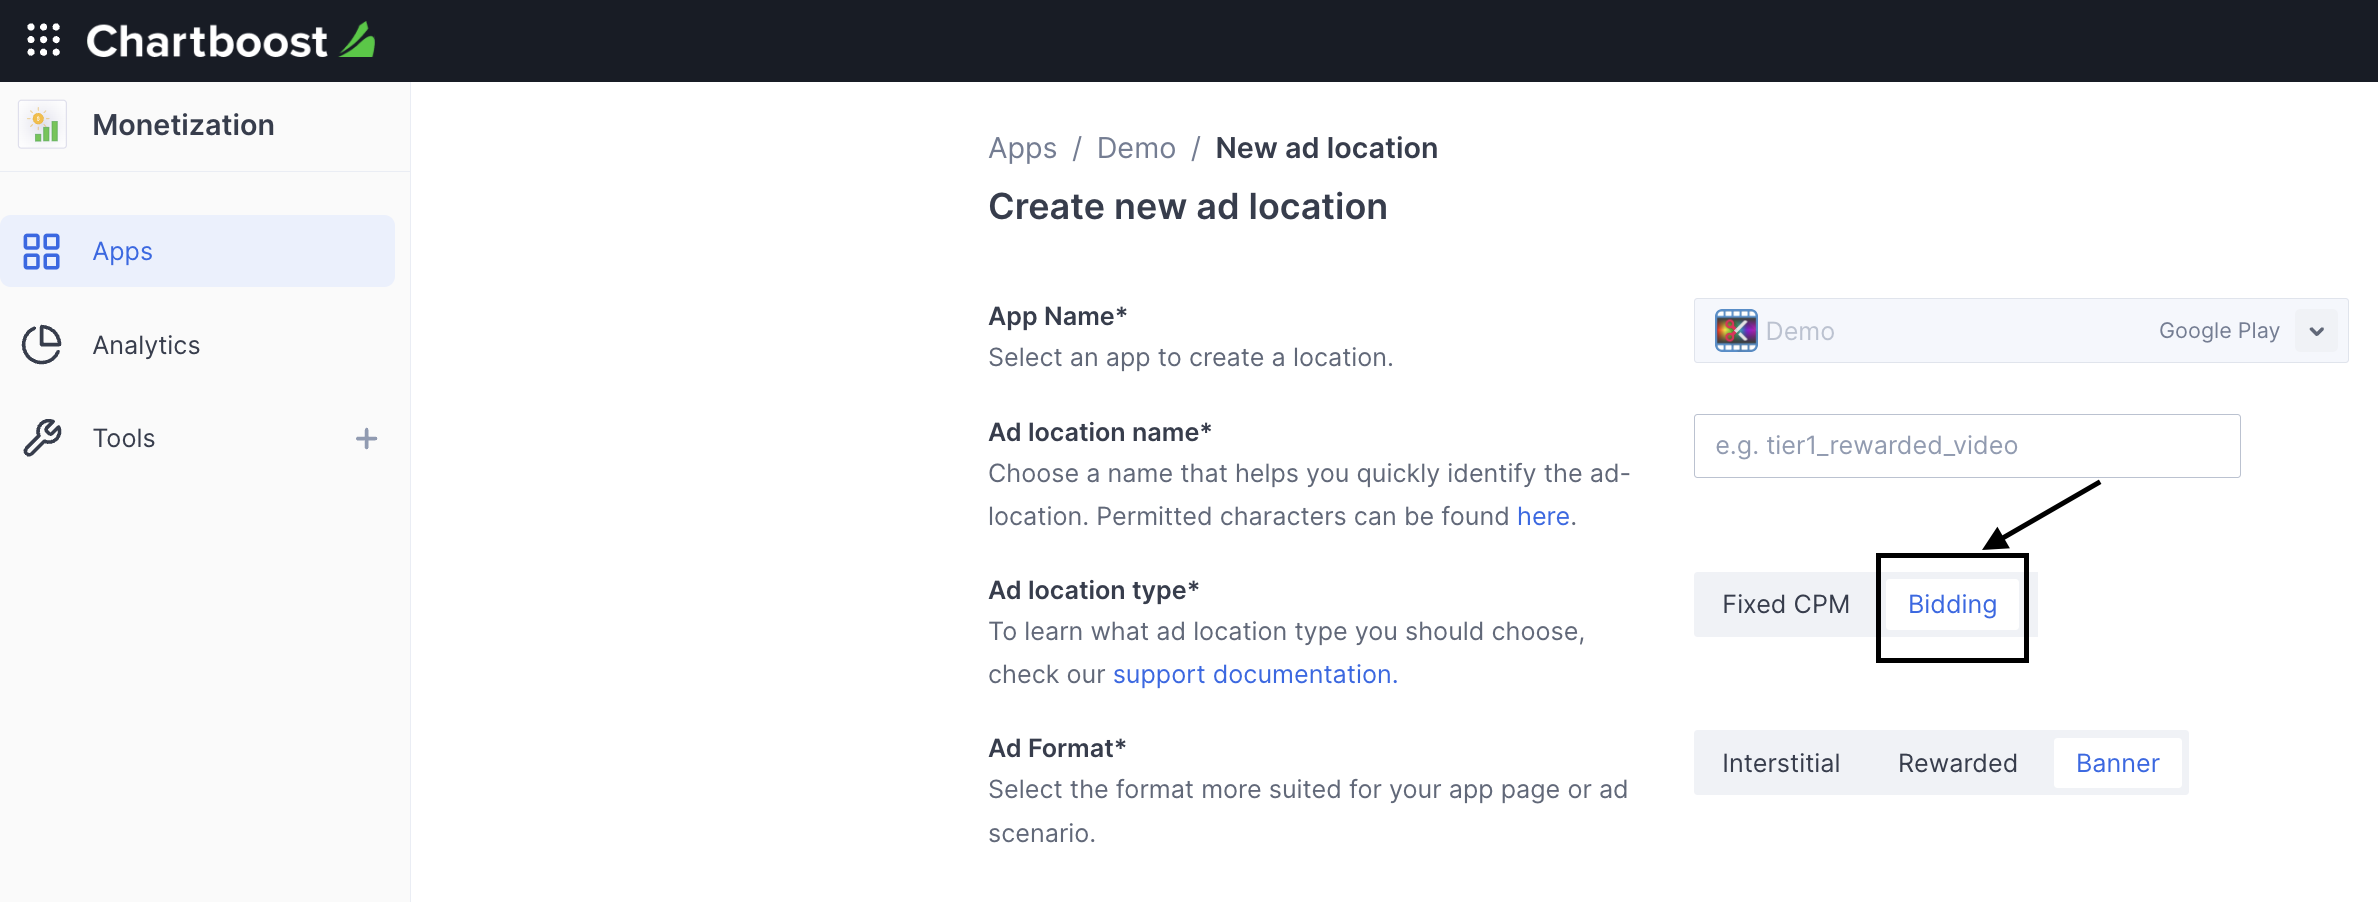
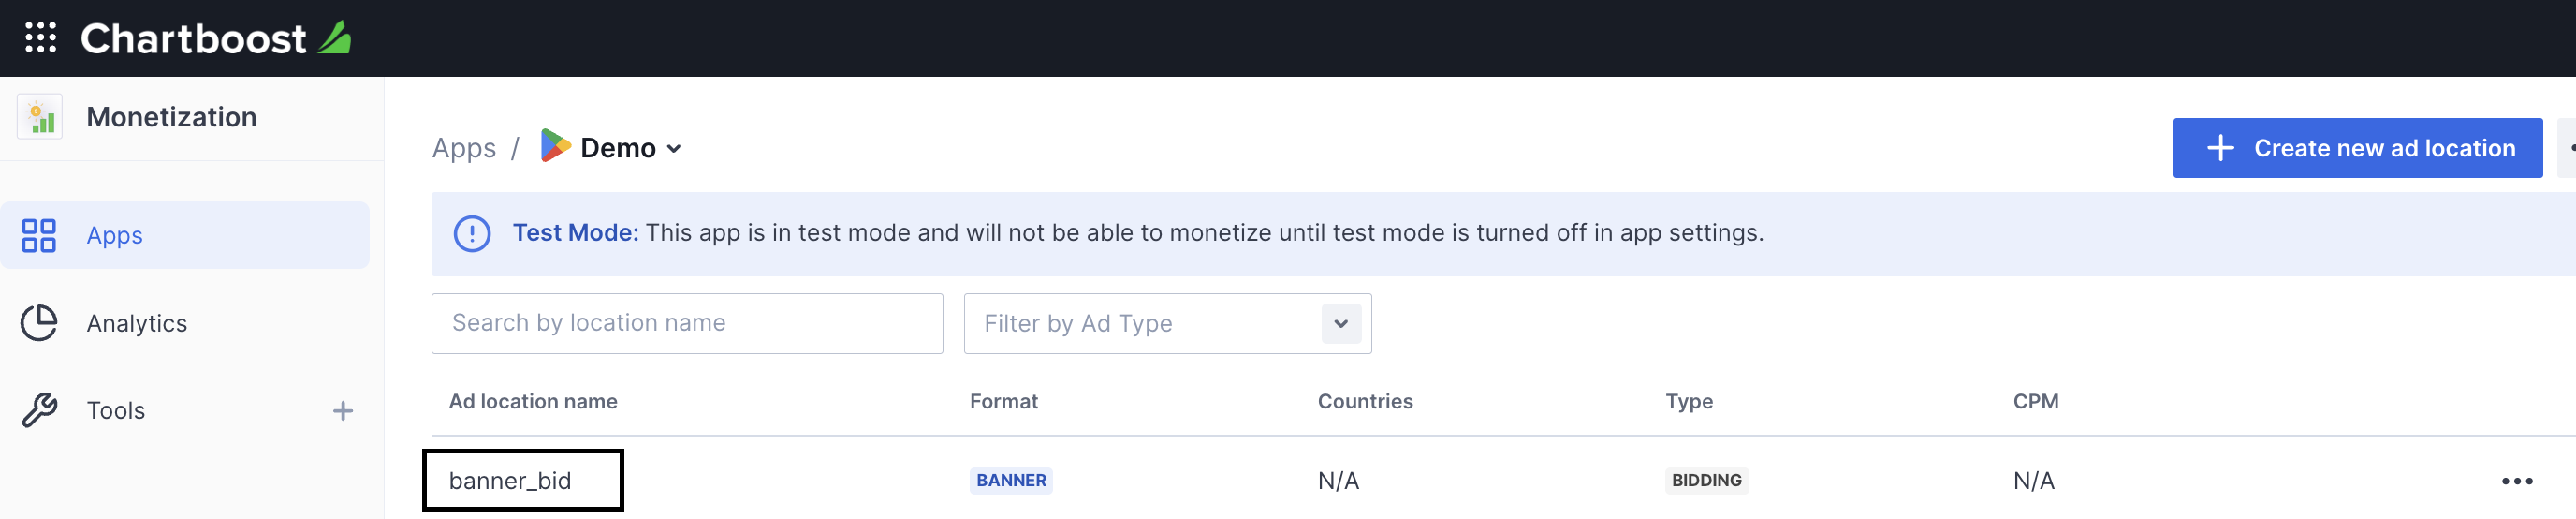
1. Create Bidding Ad Location: On your Chartboost dashboard, create Chartboost’s ad location for your app.
- Set the Ad Location Type to Bidding.
- Note the ad location name, as you will need it for the LevelPlay setup.
2. Setup Bidding Ad Location on mediation: On your Unity LevelPlay dashboard,
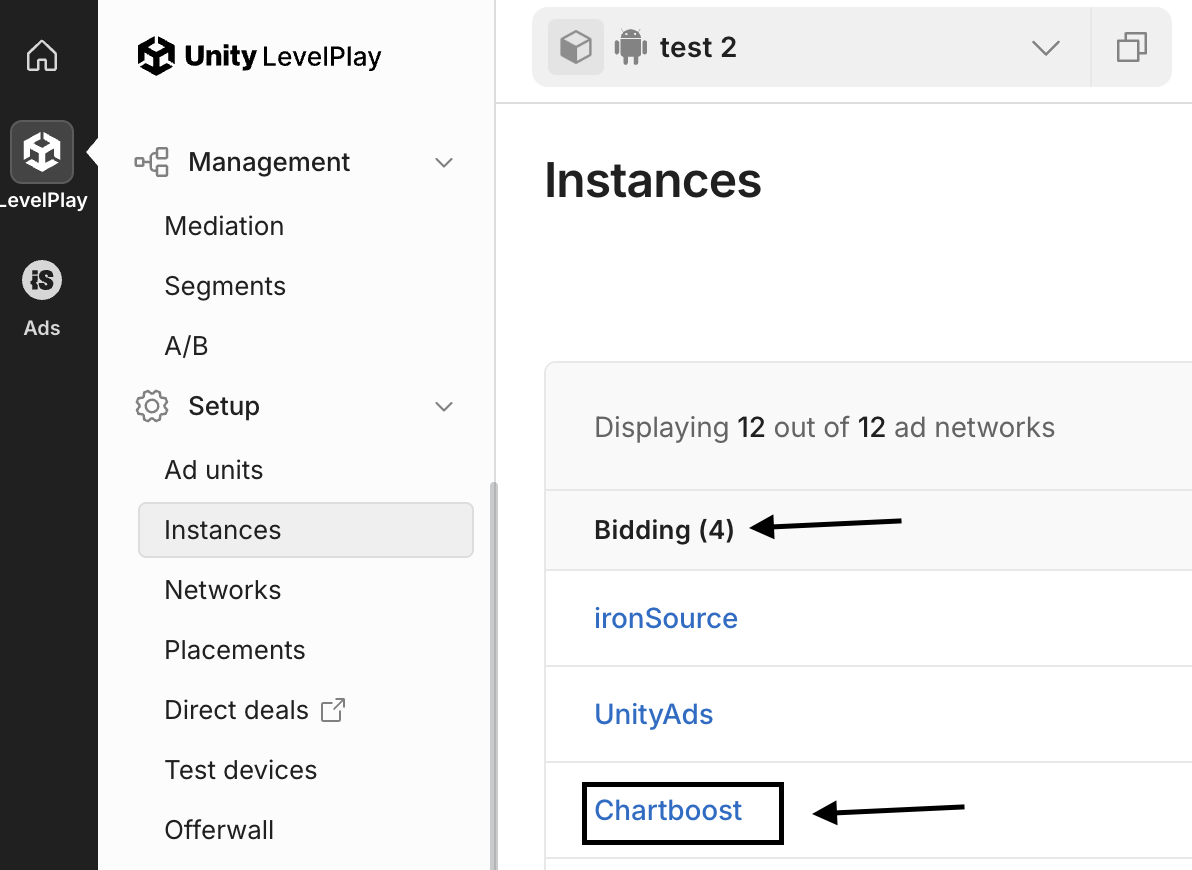
2.1 Navigate to LevelPlay dashboard > Setup > Instances, select your app, and click on Chartboost under the Bidding section.
You will see a dialog allowing you to input Chartboost’s parameters:
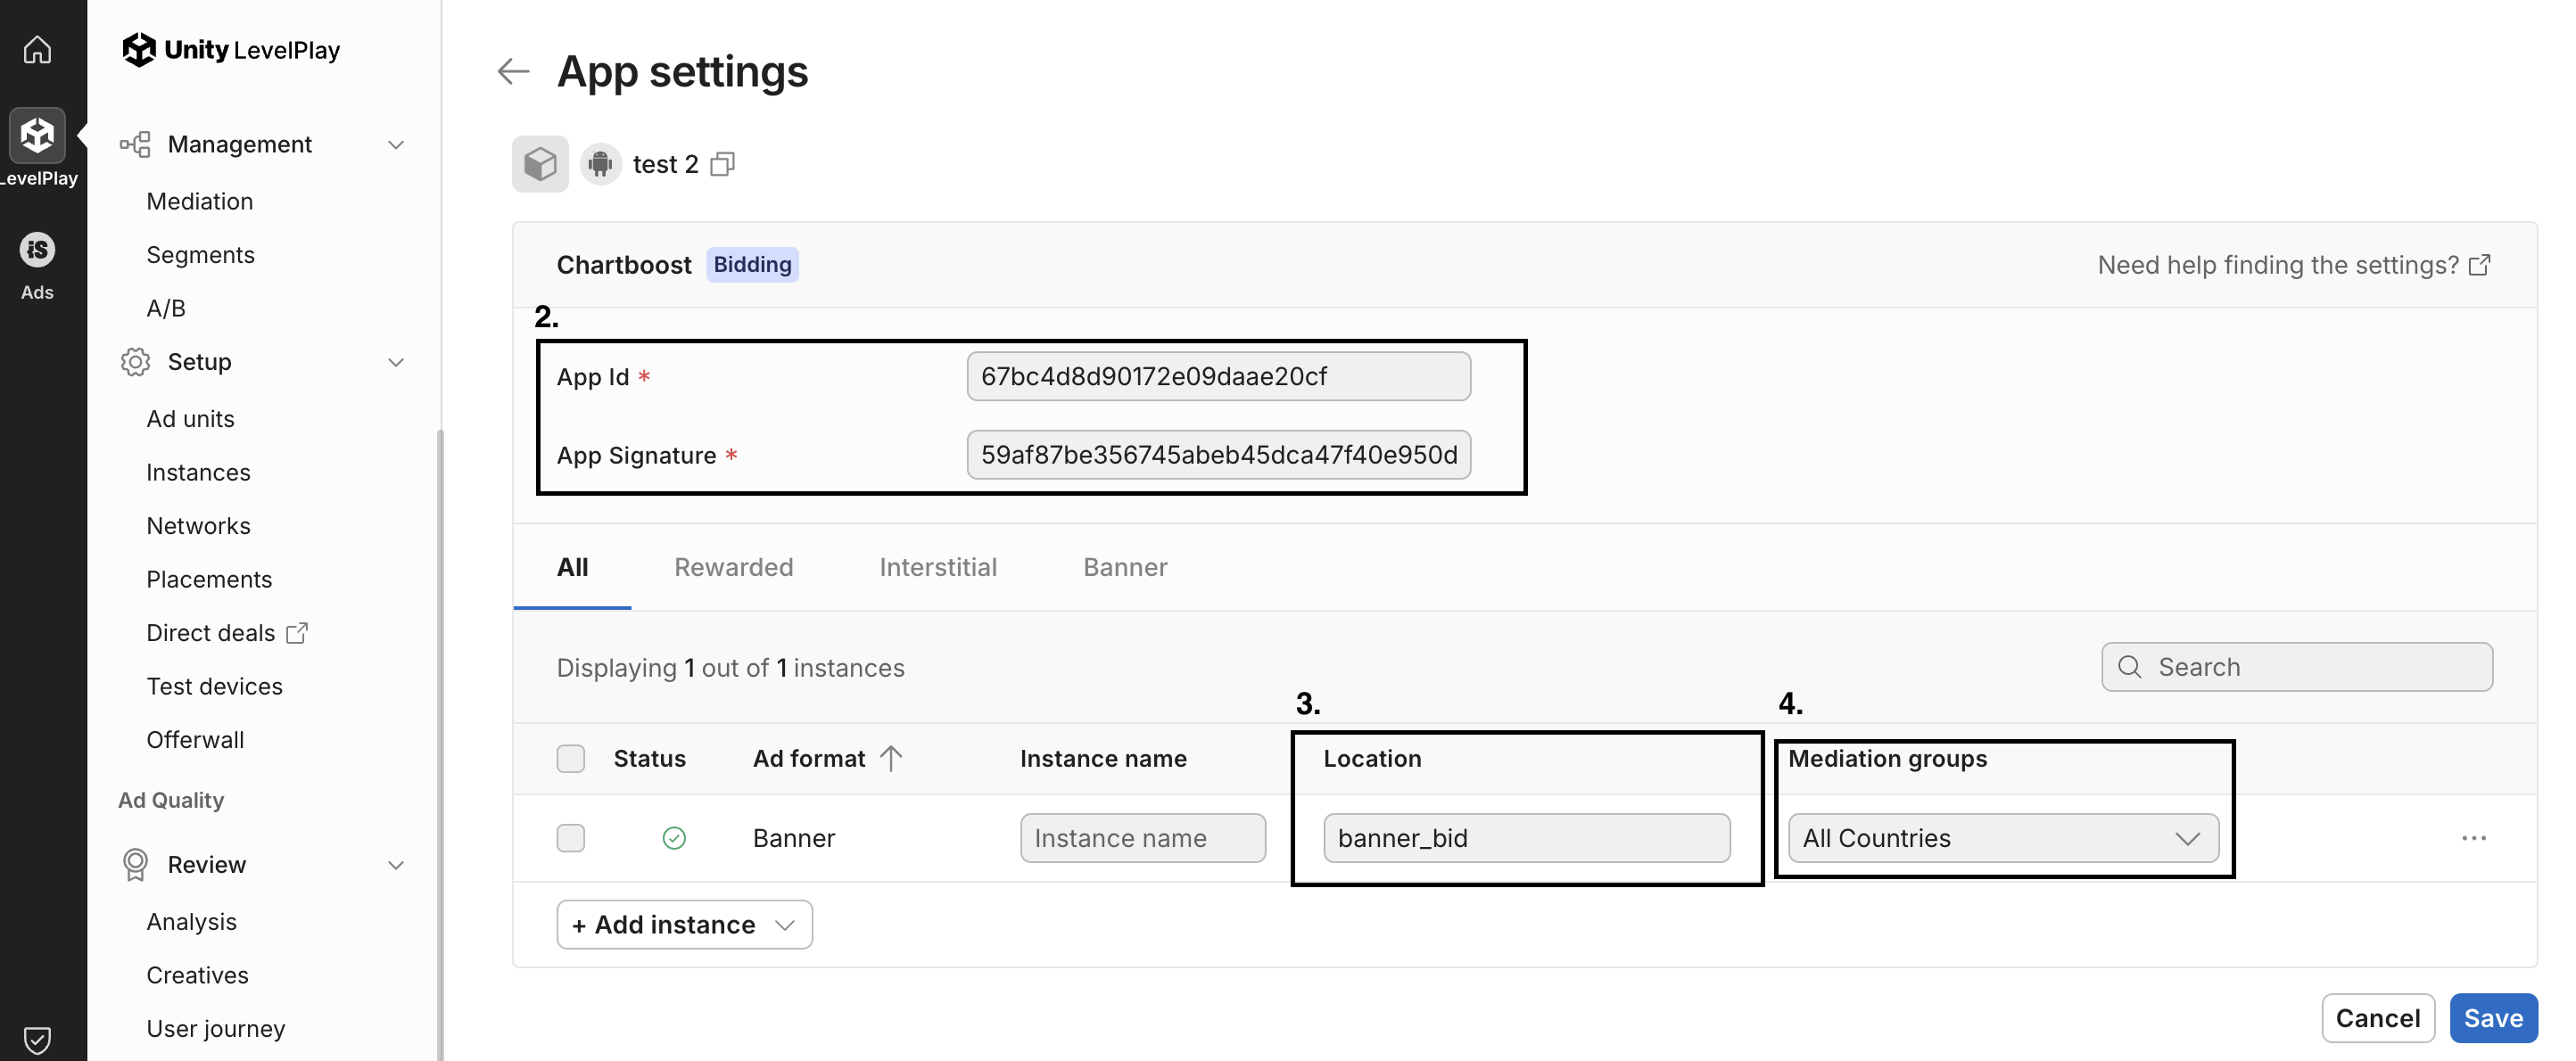
2.2 Enter your Chartboost App ID and App Signature.
* These are found in the Chartboost dashboard under Apps Management, or step 1.
2.3 Click “+ Add Instance” and select an ad format.
In the Location field, enter the corresponding Ad Location Name from your Chartboost dashboard. Important: This name must be an exact match.
You can give the instance any custom name in the Instance Name field.
2.4 In the “Mediation groups” field, activate the instance on the applicable mediation group(s).
2.5. Repeat these steps for each ad format, then click Save.
You’re all set! Chartboost is now enabled as a bidding network.
How to set up Chartboost Waterfall (non bidding) Instances in Unity LevelPlay 🔗
1. Set up the Chartboost Instance 🔗
-
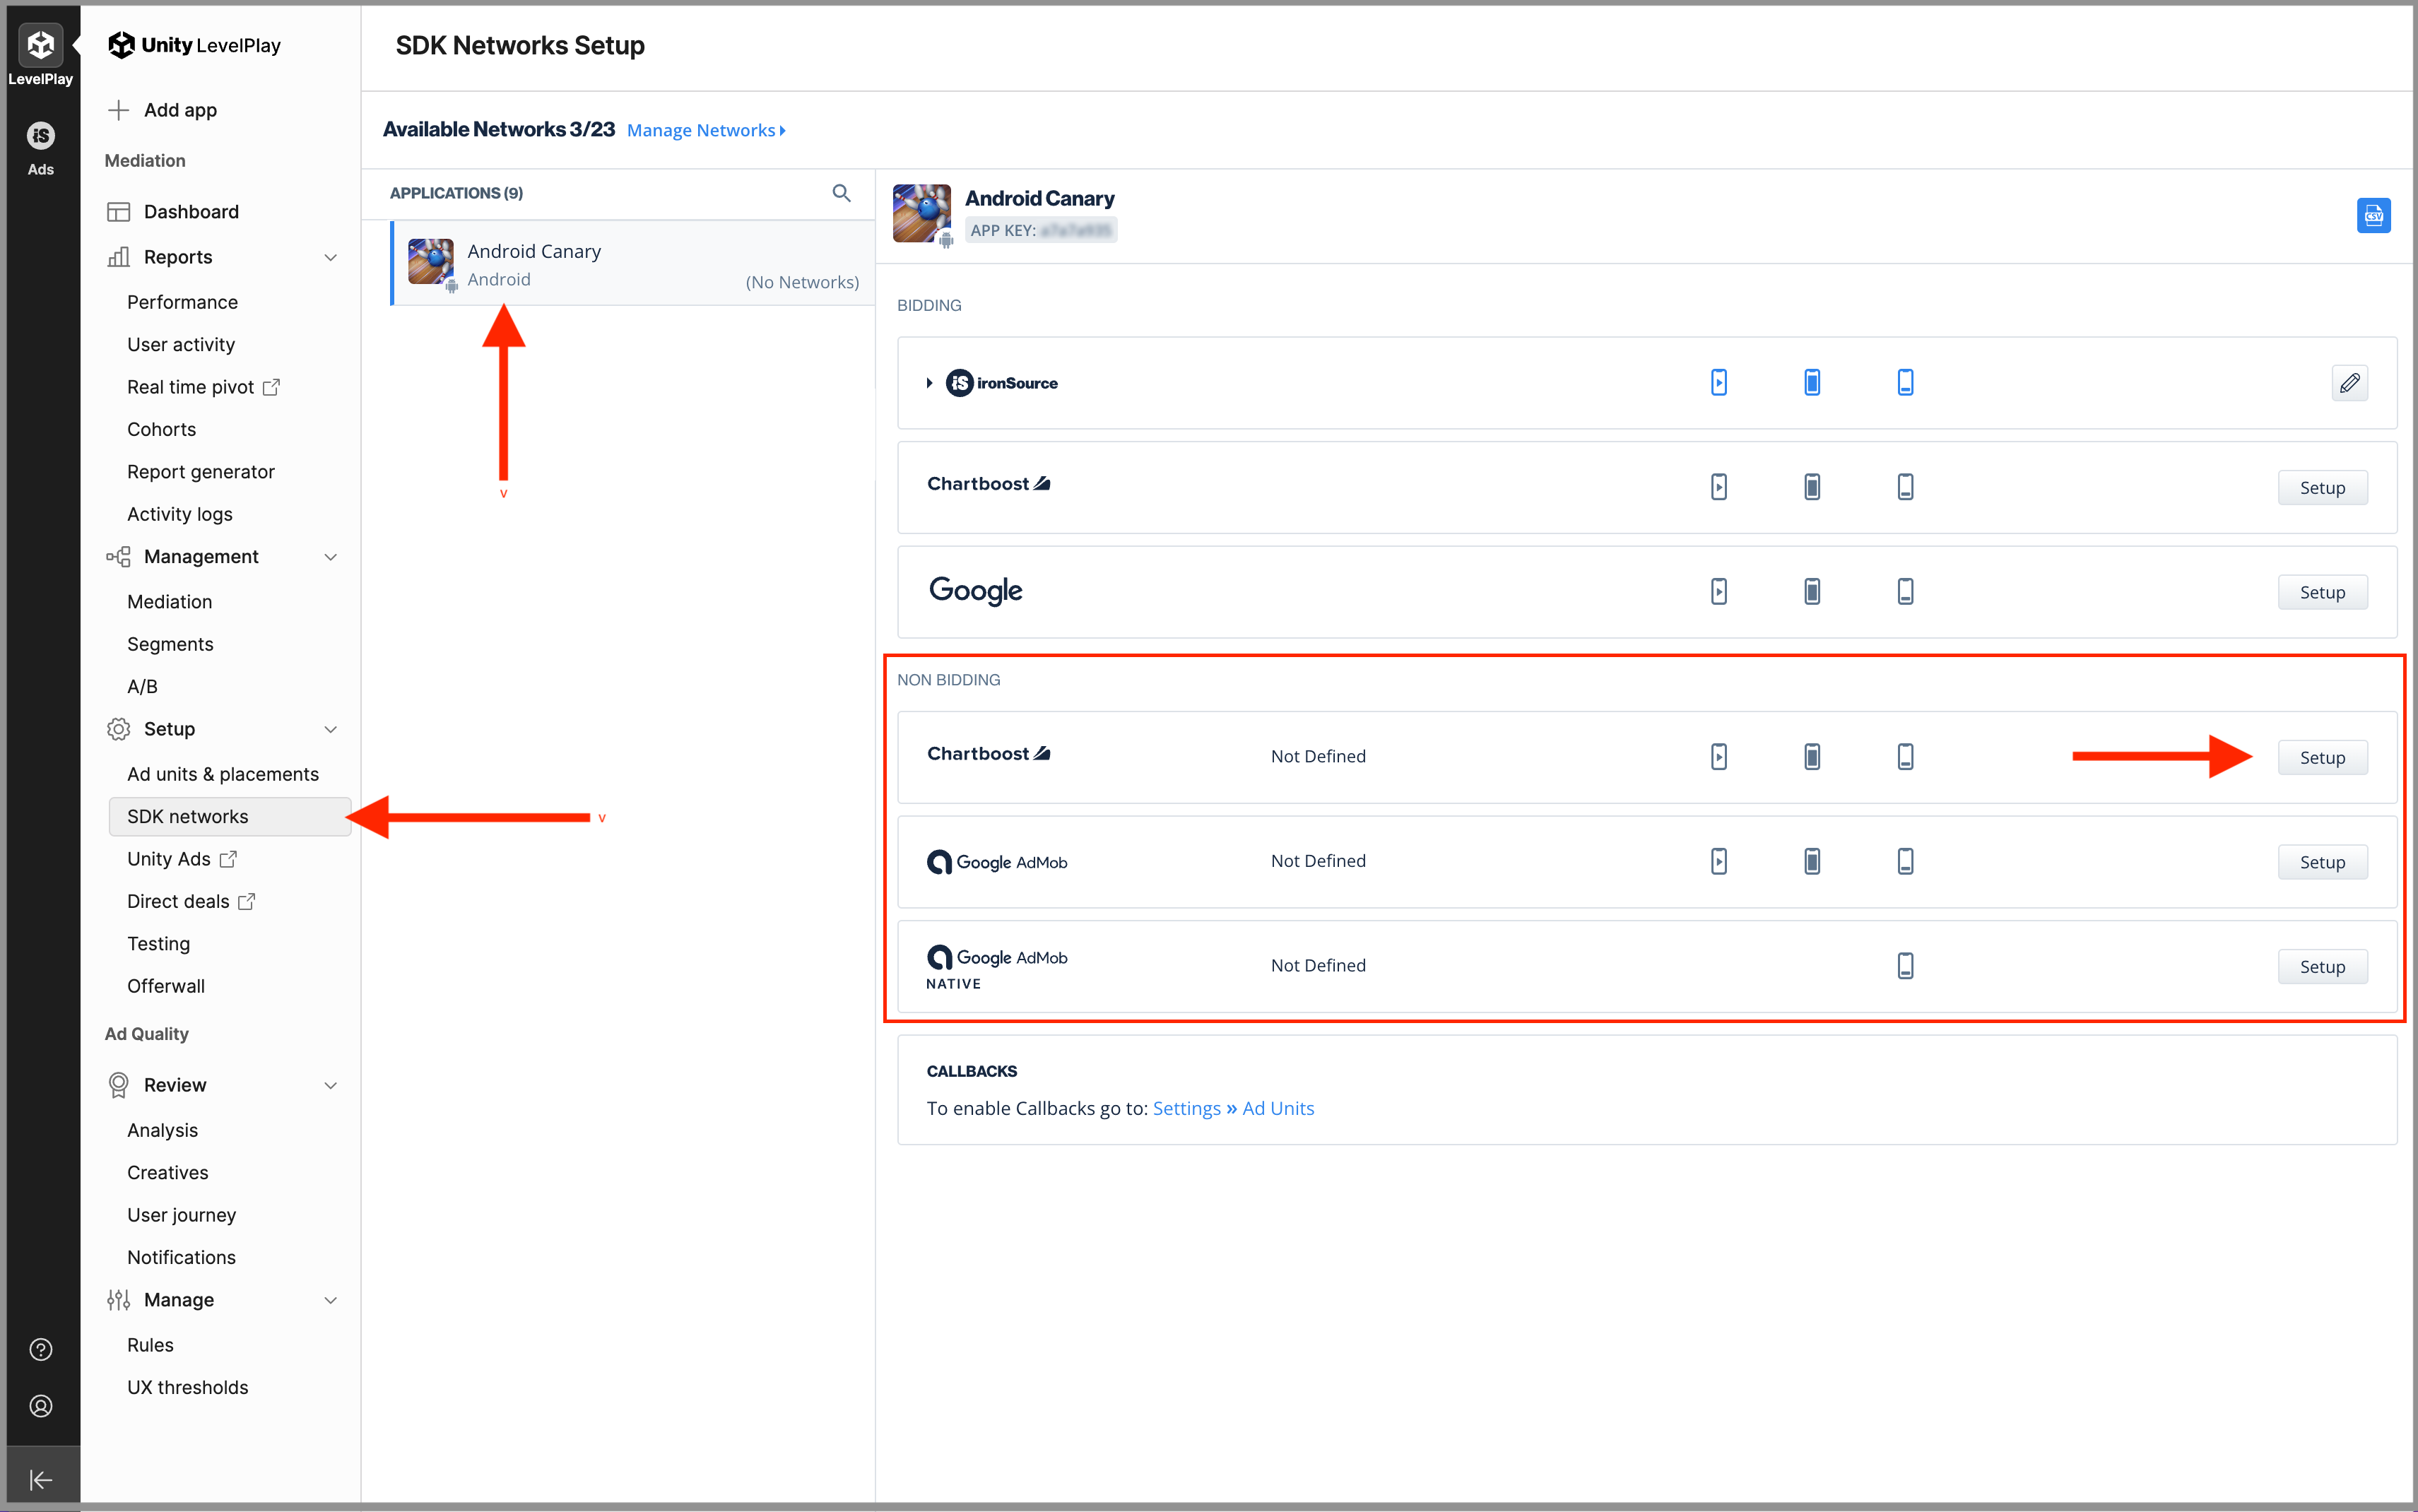
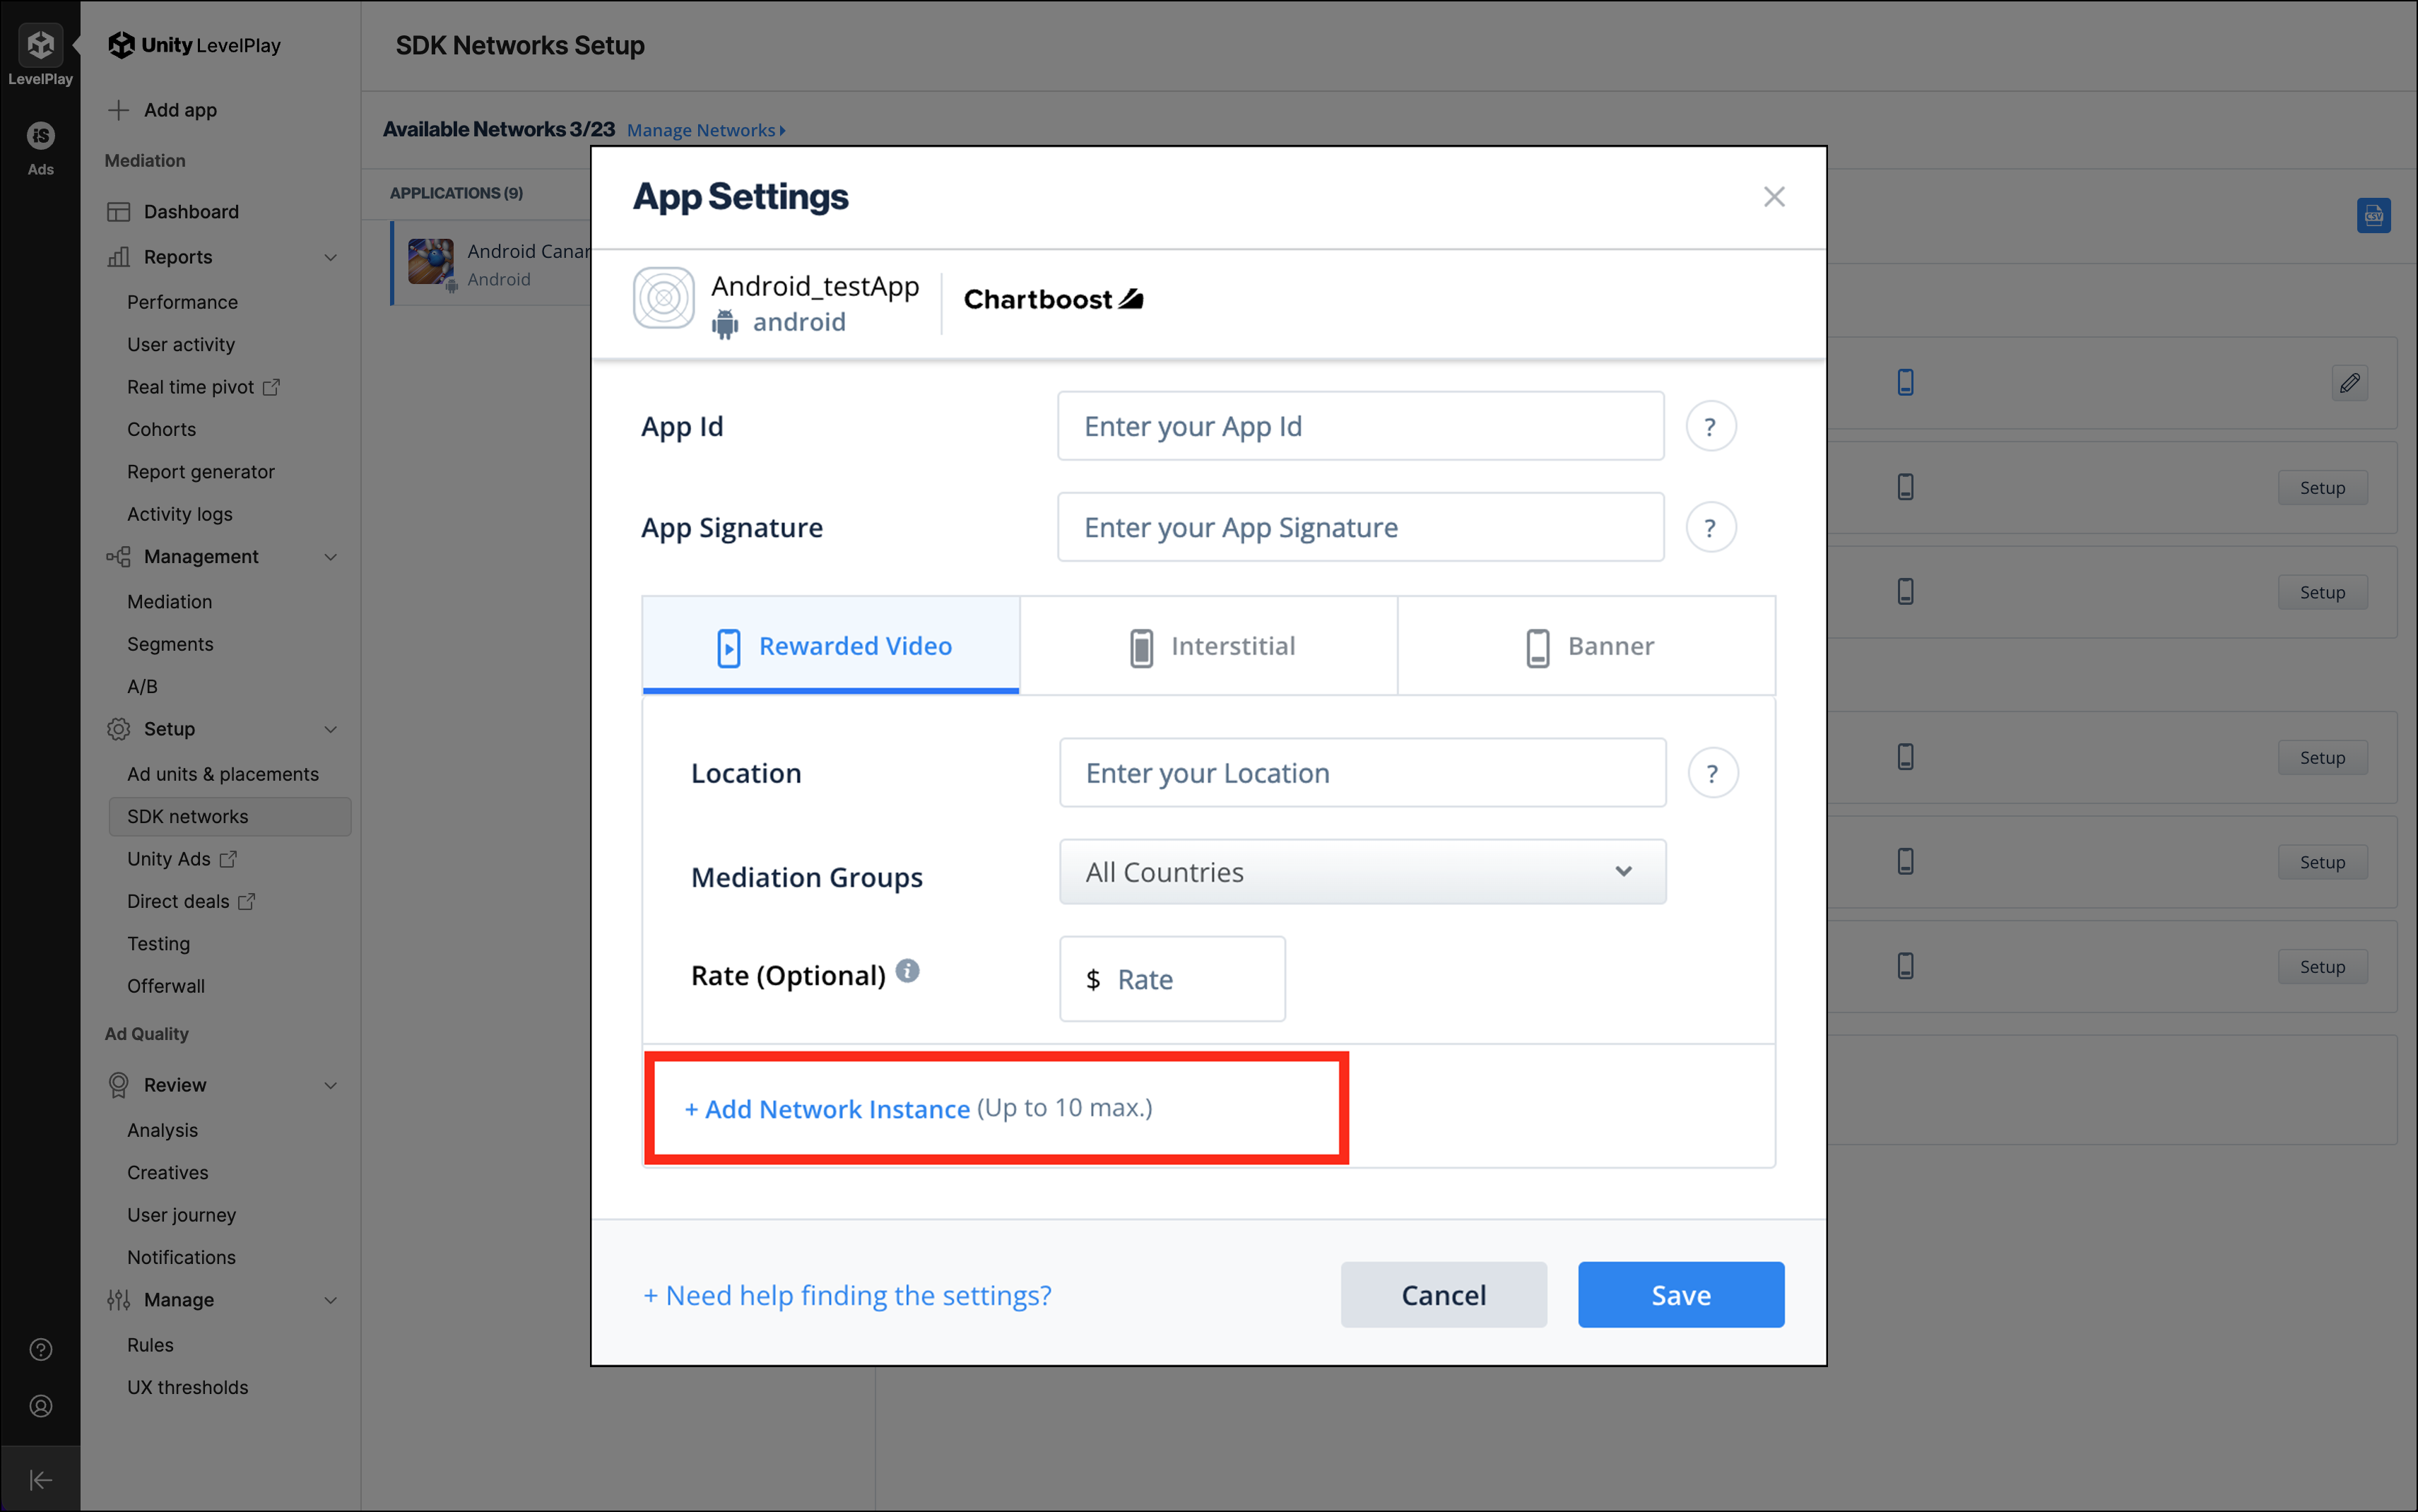
Log into your Unity LevelPlay platform and navigate to Setup > SDK Networks. Click on the desired app from the list of applications. To the right, find Chartboost under Non Bidding, then click on Setup to create a Chartboost Instance.
-
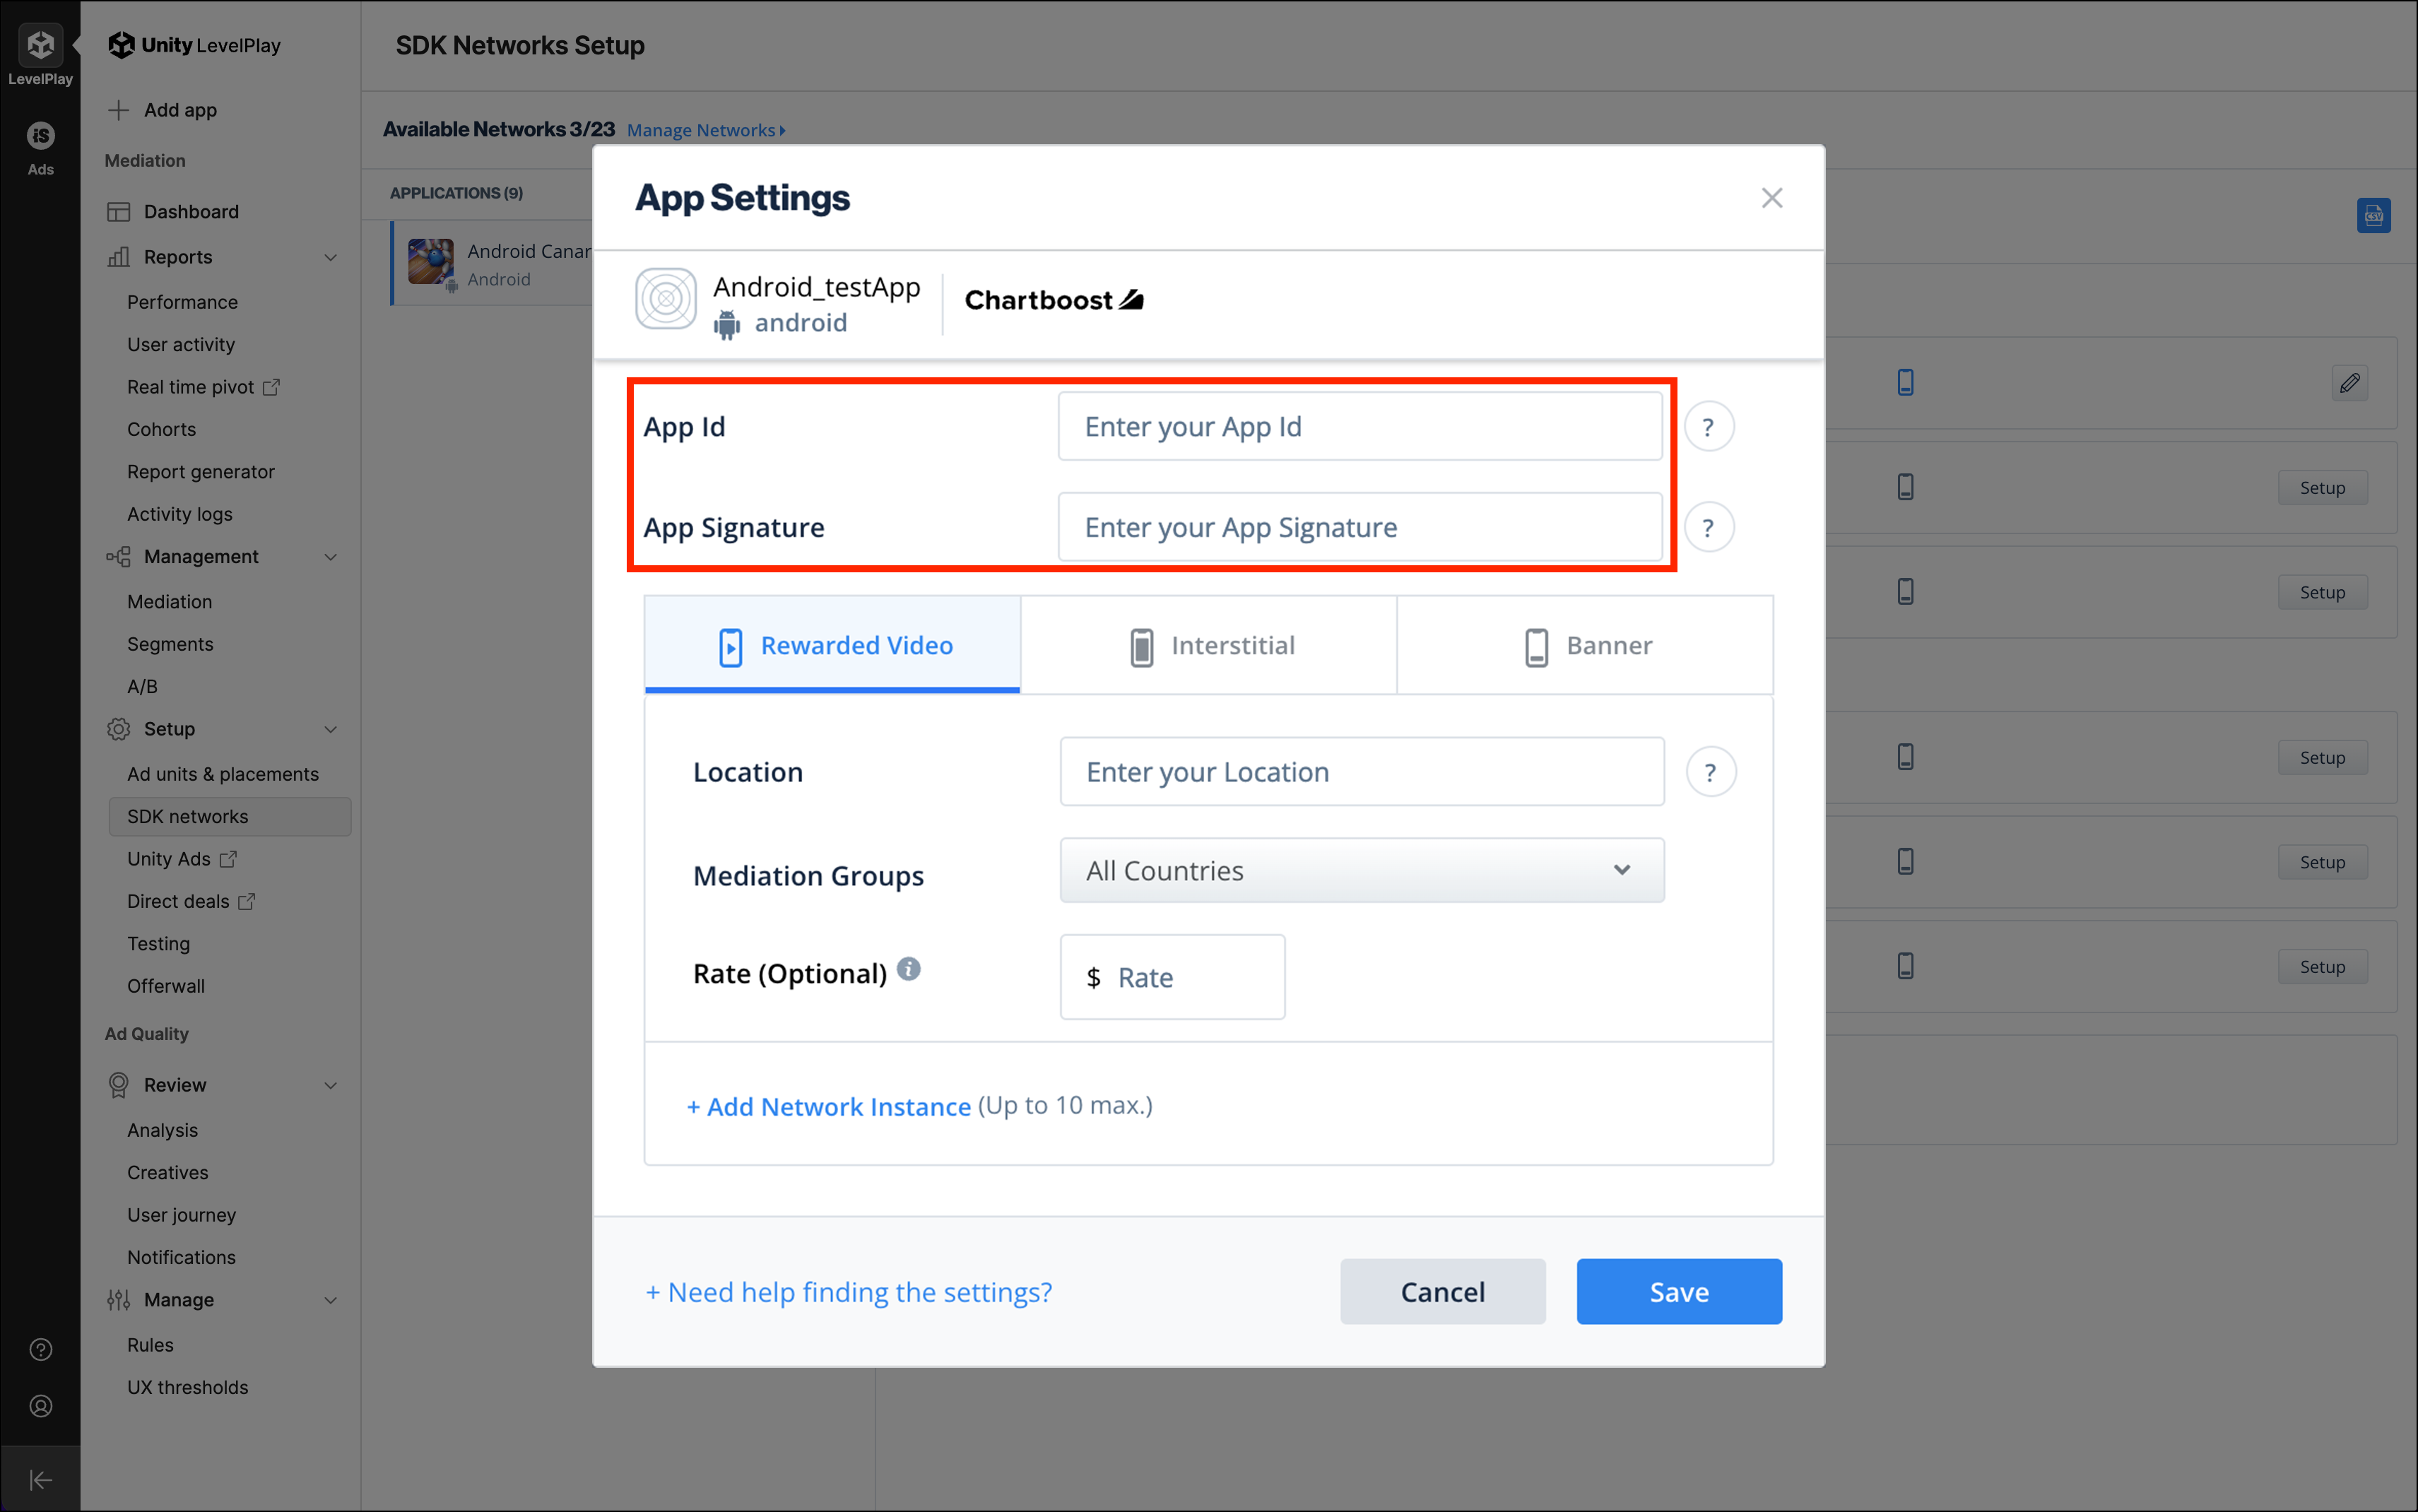
Enter your Chartboost App ID and App Signature into the App ID and App Signature boxes. In your Chartboost platform, navigate to Apps Management and select the app. The App ID and App Signature will be listed on the right column under App information.
-
Select the ad type. Chartboost supports rewarded video, interstitial, and banner ads with Unity LevelPlay.
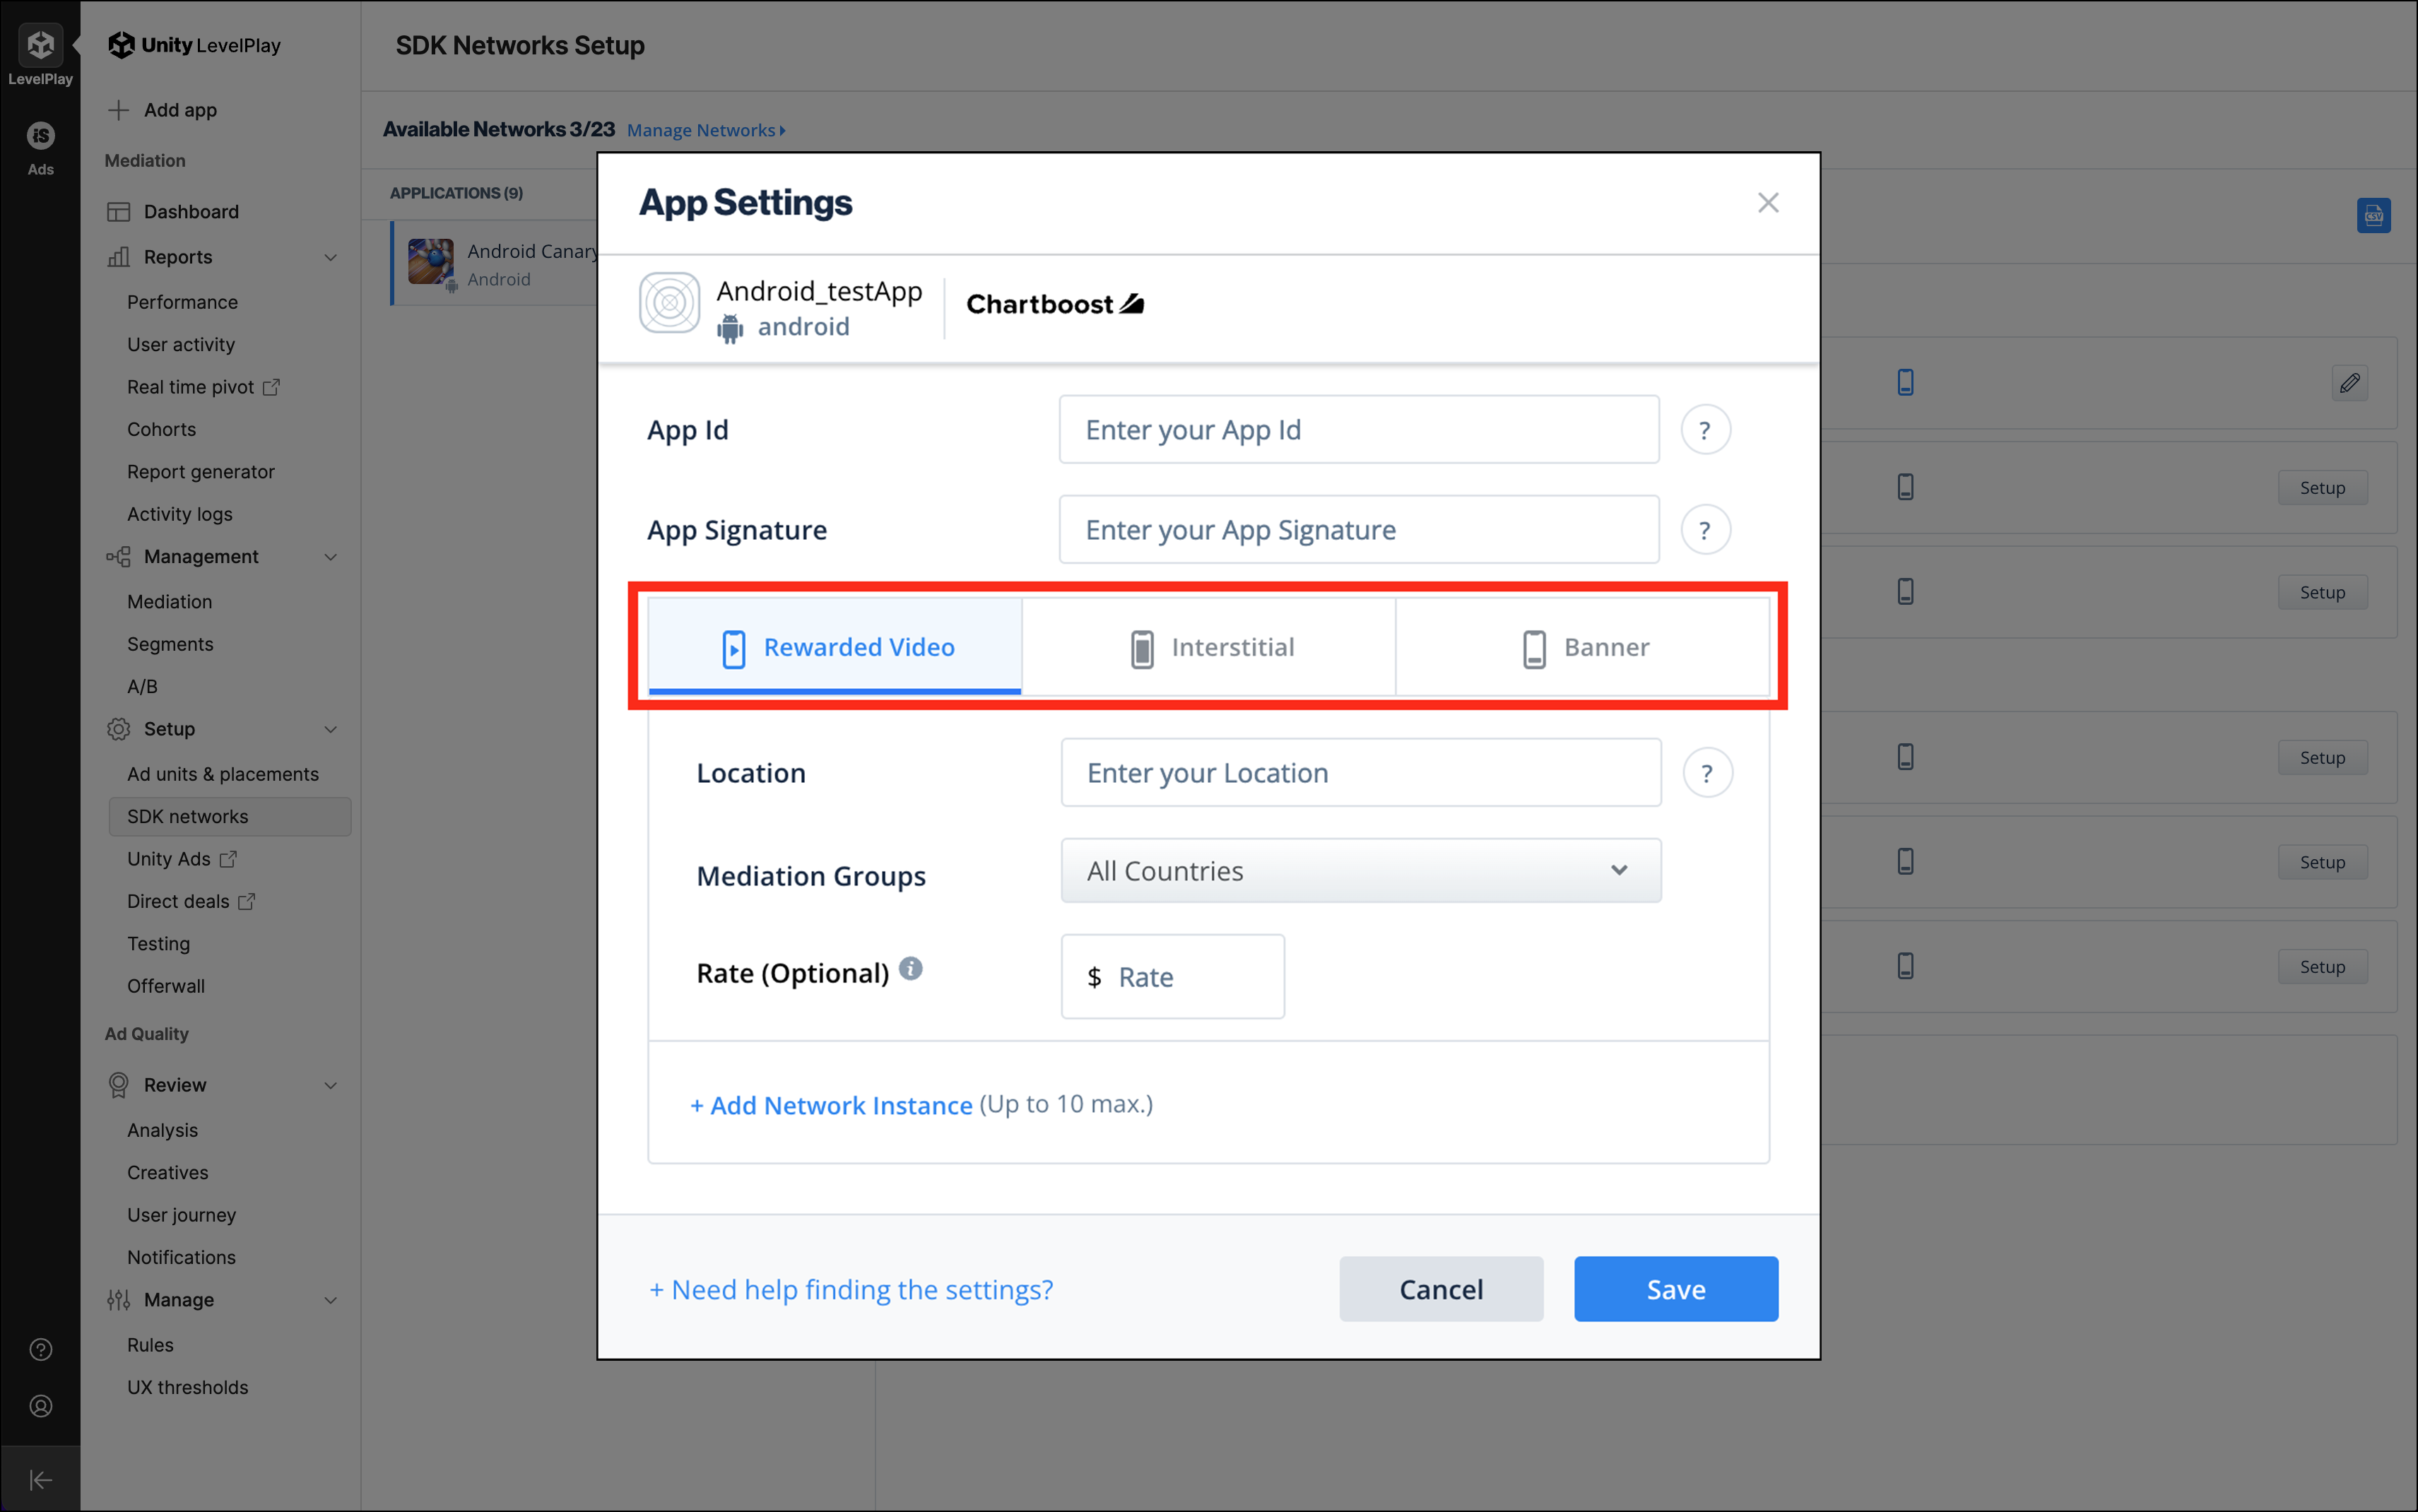
- Enter a value for Location. In the Chartboost platform, this is also referred to as an Ad Location. Login to your Chartboost platform. Navigate to Monetization and select the app. Enter the Chartboost Ad Location Name to the Unity LevelPlay Location field. If there are no ad locations listed, then you will need to create new ad locations before continuing.
-
Ad Location Name can NOT be longer than 80 characters. Note: Chartboost app country API can provide data breakdown by
adLocationvalues that cross a small threshold of activity (generally around 10 different ad creatives displayed, for example), otherwise they will not be broken out and instead aggregated under theothergrouping.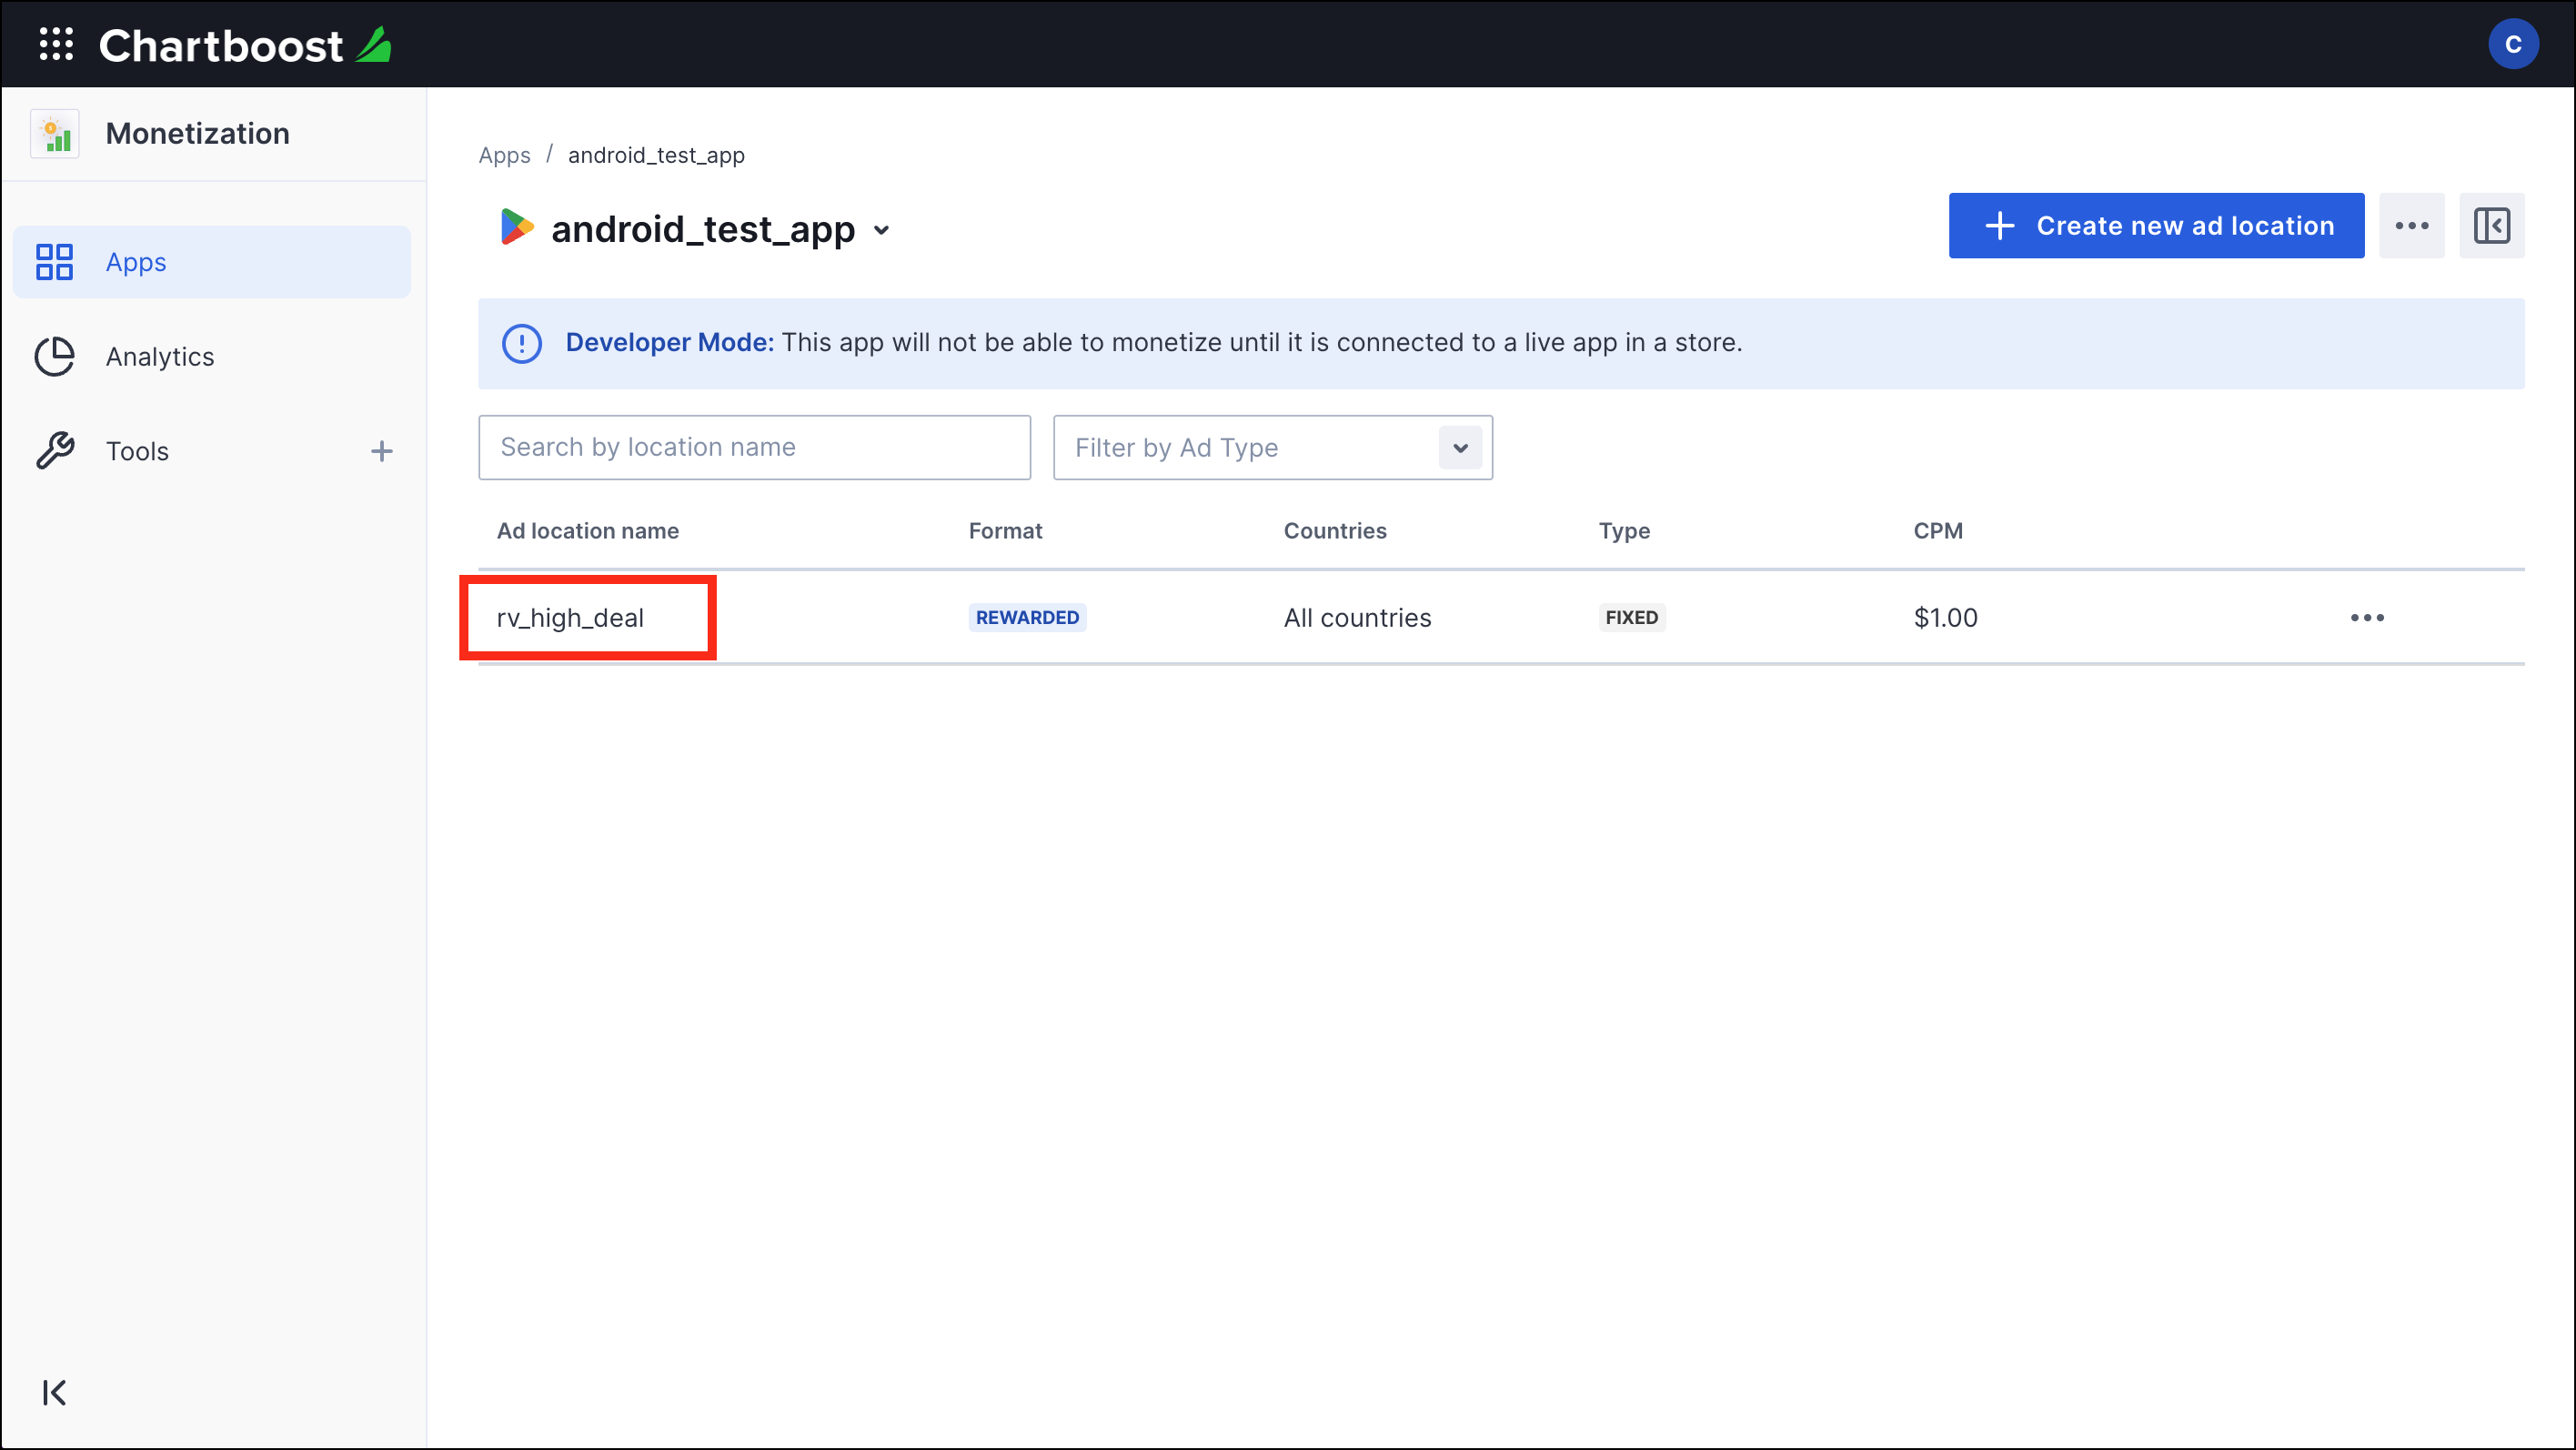
-
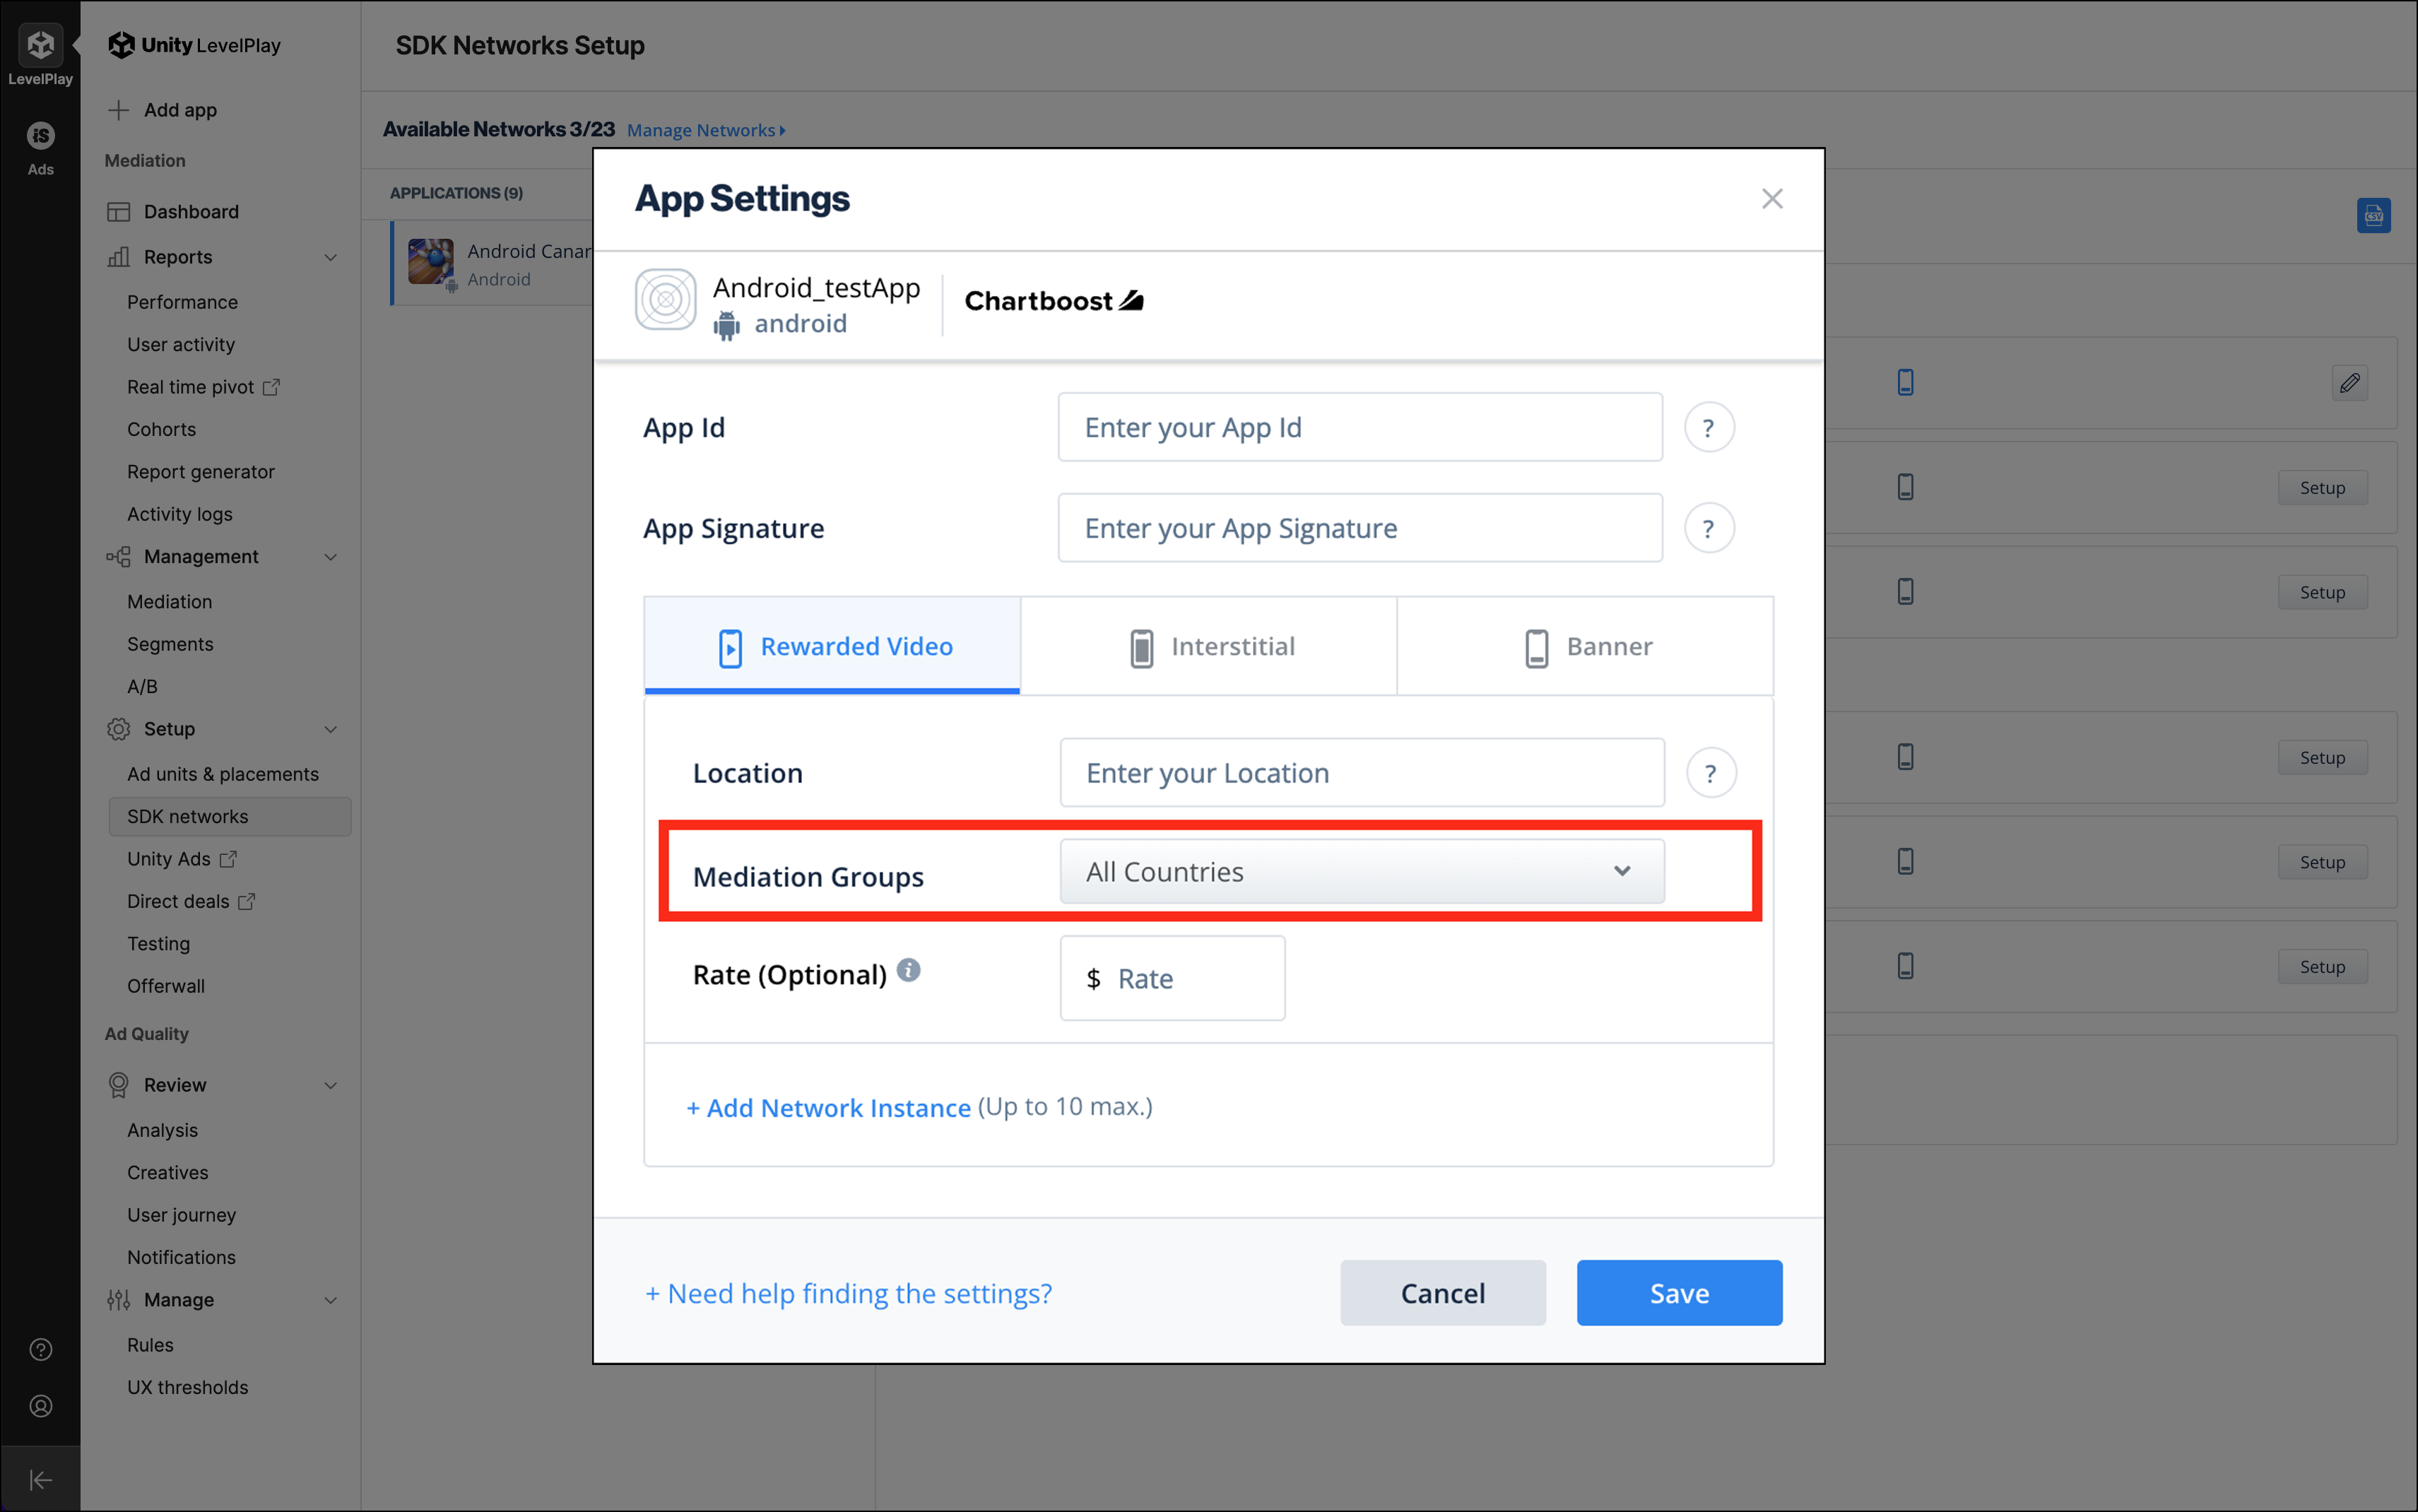
Set a country group. Learn more about creating custom country groups in Unity LevelPlay.
-
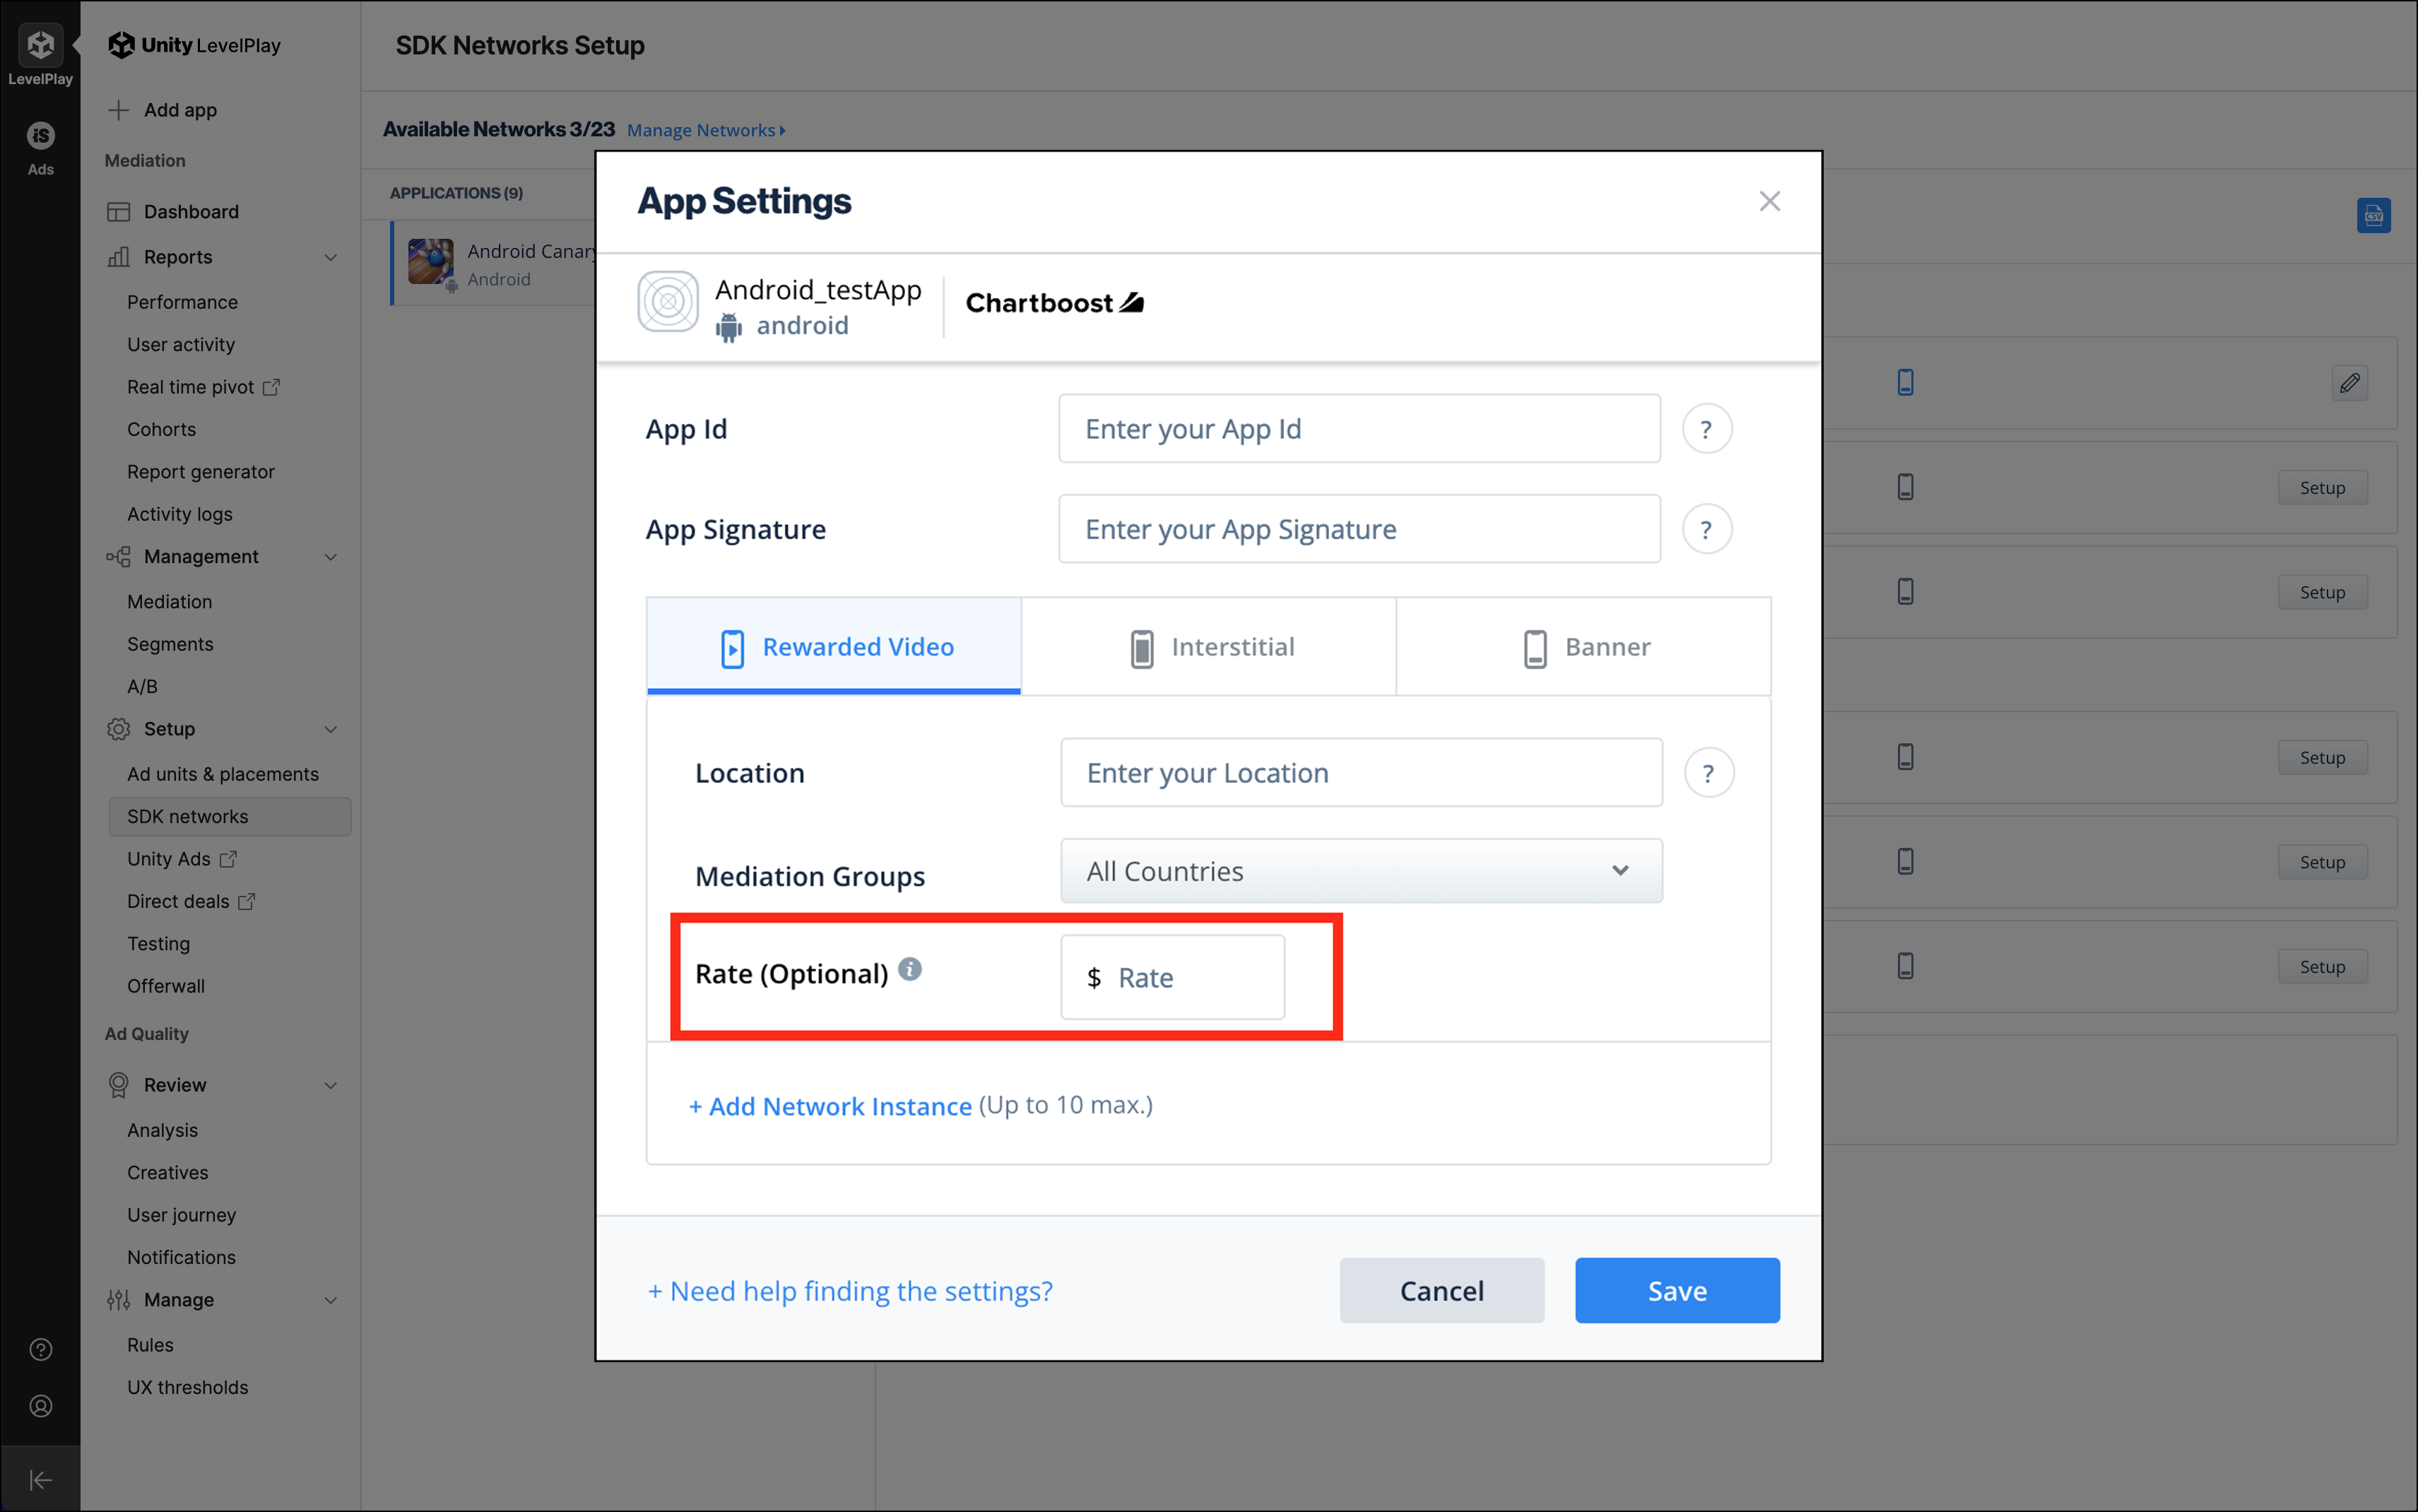
Set a rate to manually assign a price for this instance’s waterfall prioritization. This field is optional. Learn more about Unity LevelPlay’s rate setup.
- Continue on to the Add More Chartboost Instances section to add more Chartboost instances. Otherwise, click Save and continue to the next section.
Add more Chartboost Instances (Optional) 🔗
-
To add more Chartboost instances, click on +Add Network Instance.
-
When you have more than one instance, Unity LevelPlay will require you to set an Instance Name. We recommend using the Location name for the Instance Name.
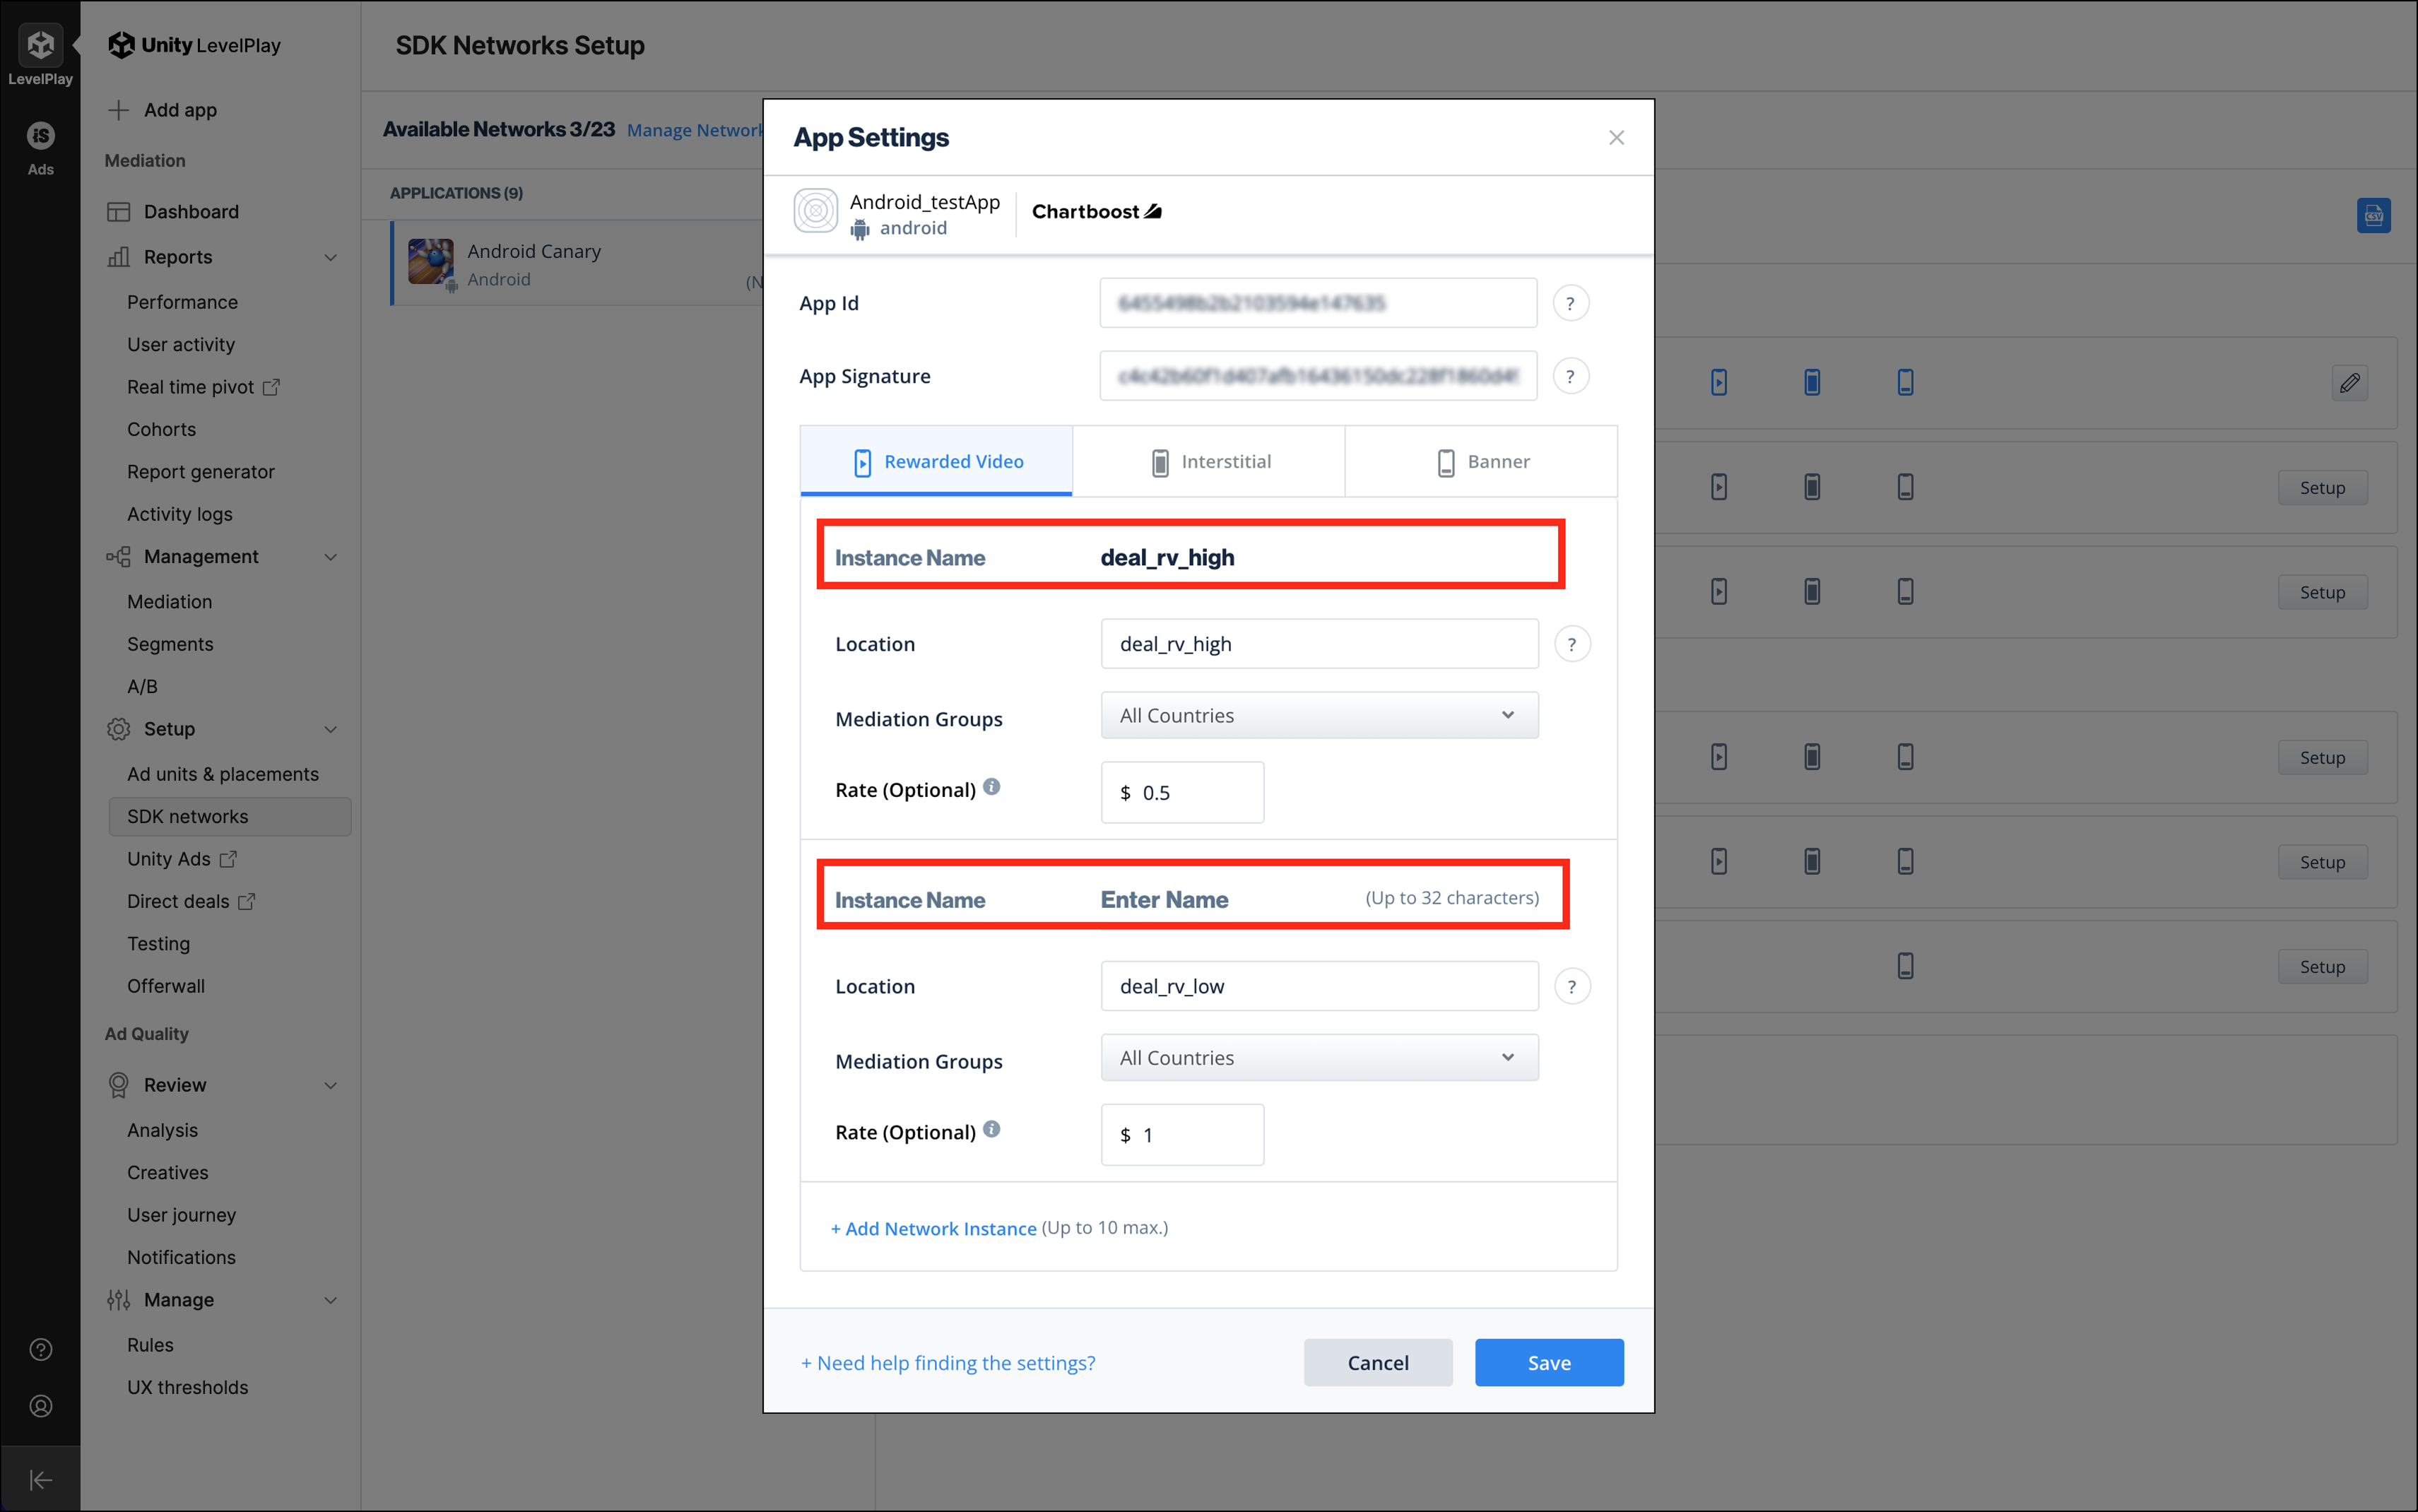
- Enter another Location (in the Chartboost platform this is also referred to as an Ad Location) for the new instance.
- Set a country group.
- Enter a rate amount (optional).
- Repeat the steps above to add up to 10 different instances from Chartboost. Click on Save when finished.
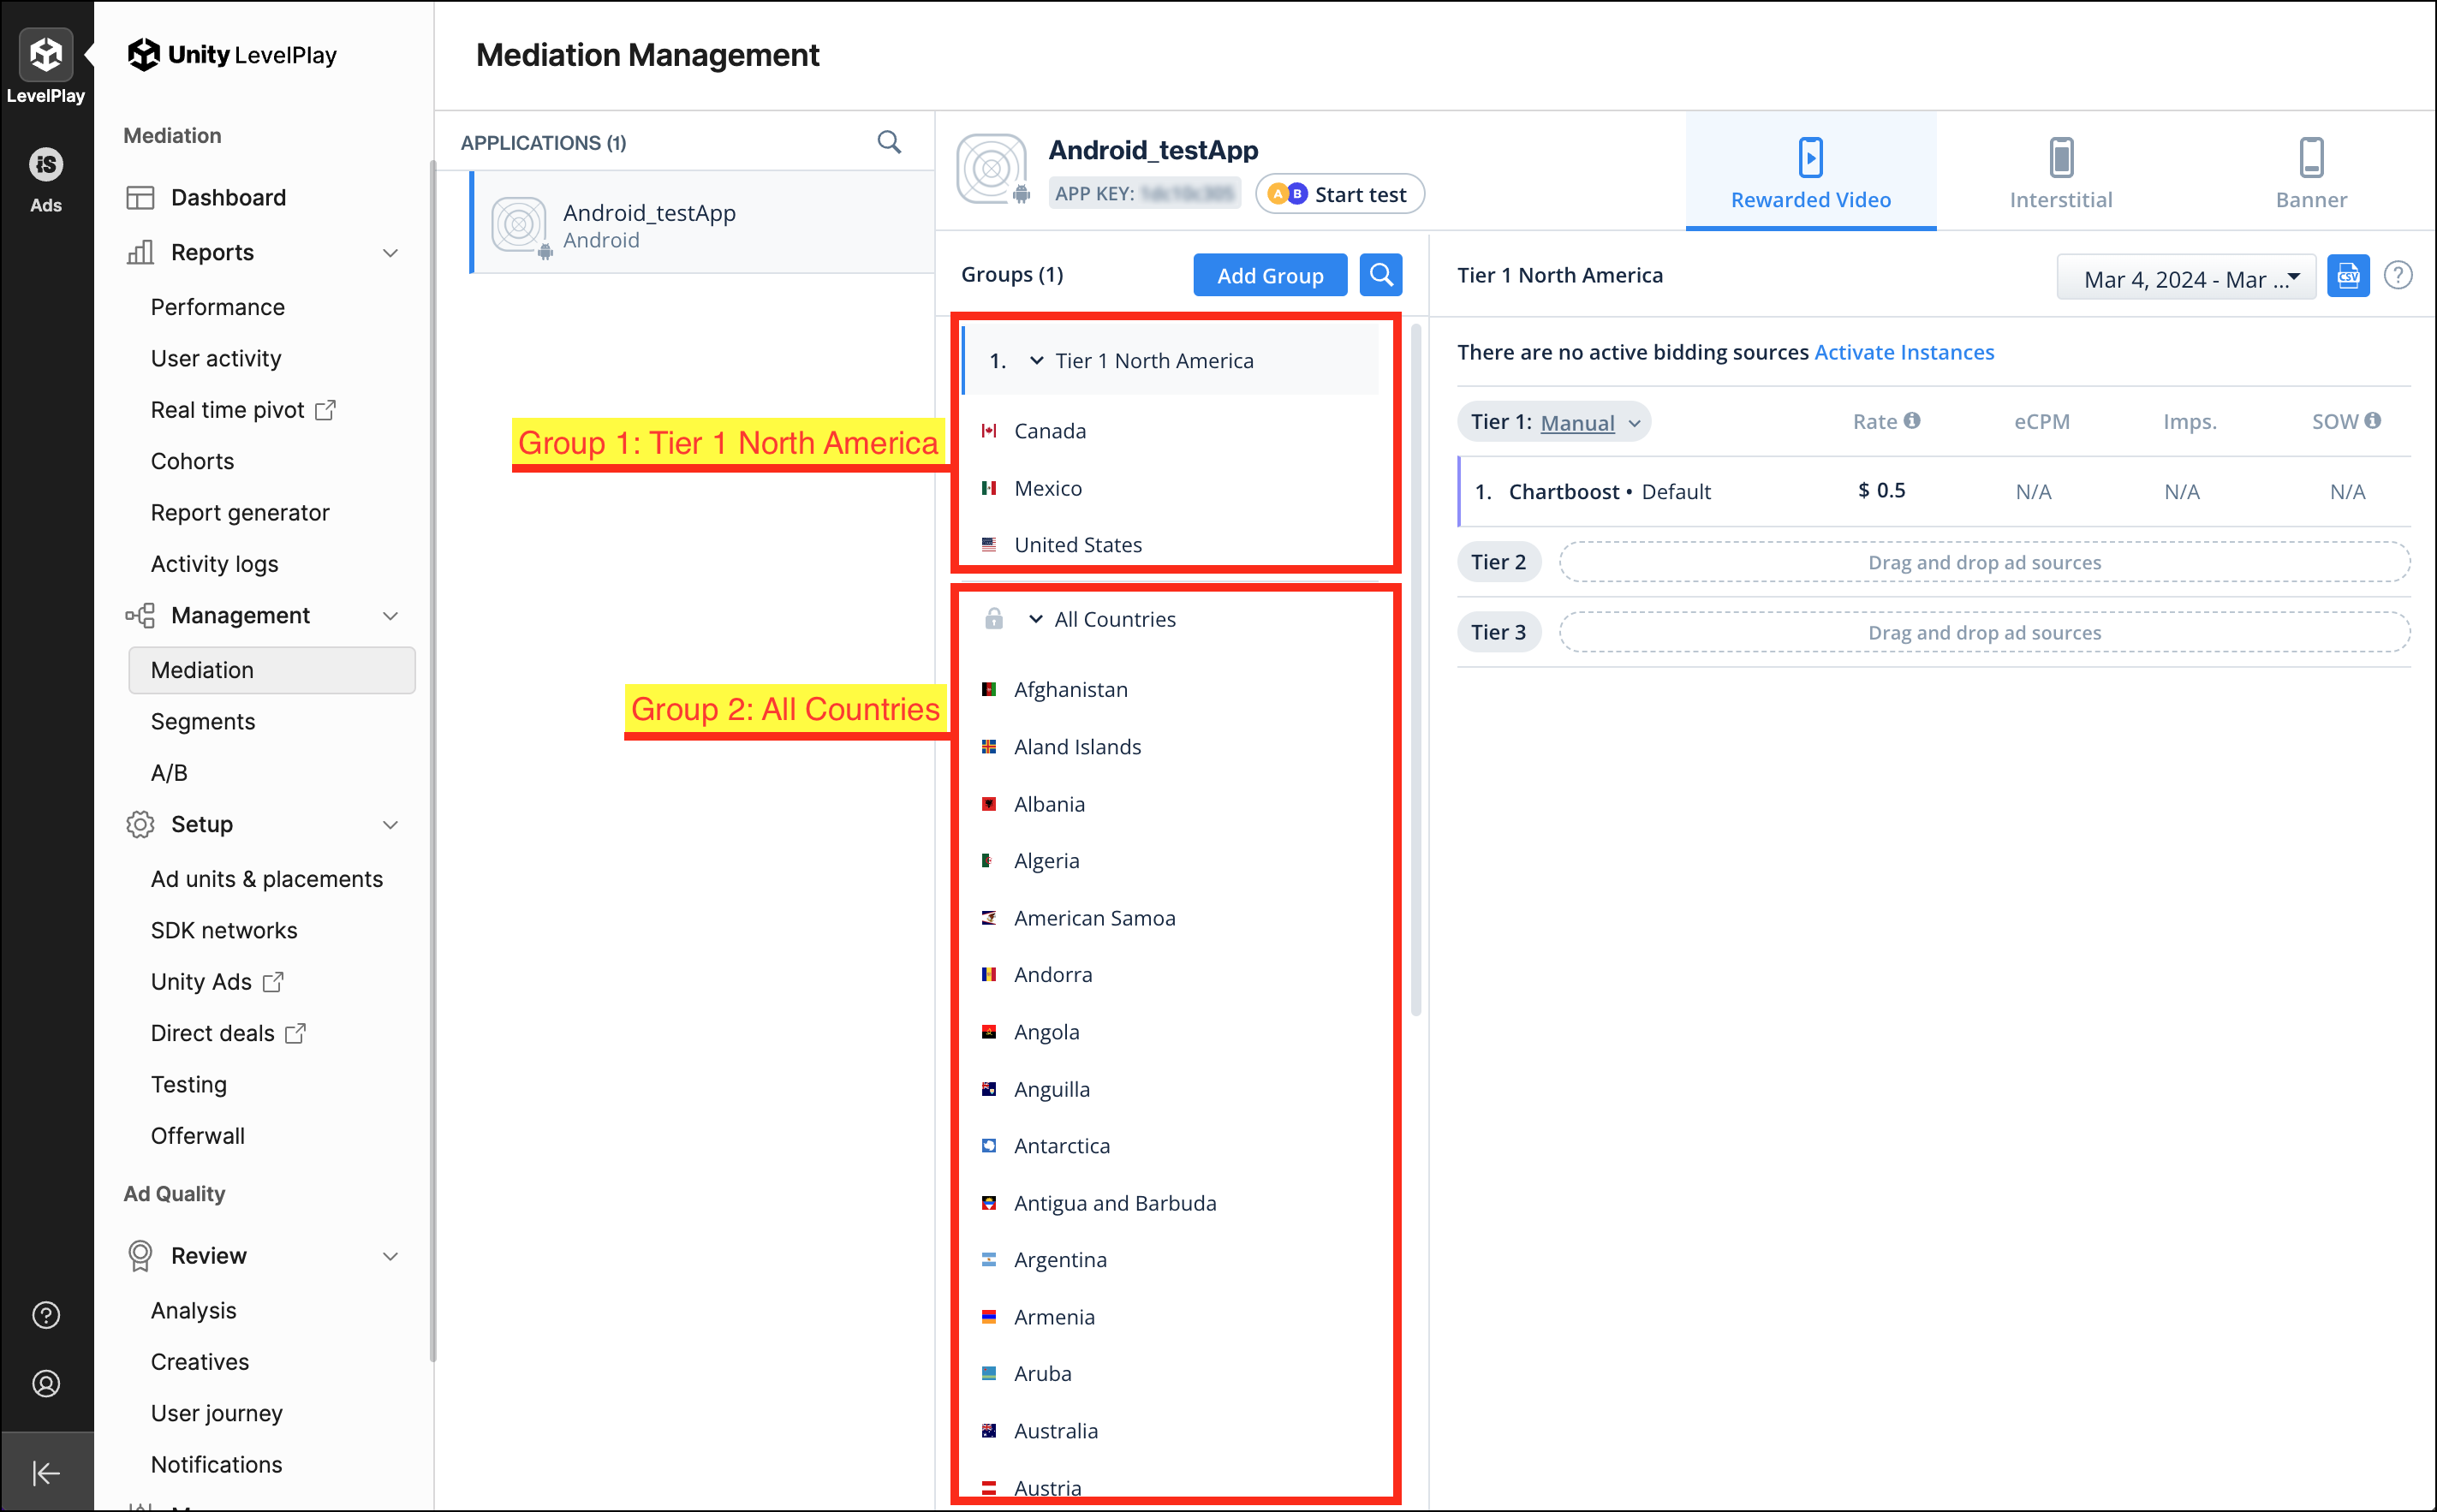
2. Include Chartboost Instances in Mediation Groups 🔗
If you have more than one Mediation Group in Unity LevelPlay, please remember to include all the Chartboost instances in each of the Mediation Groups where you would like to serve Chartboost ads.
-
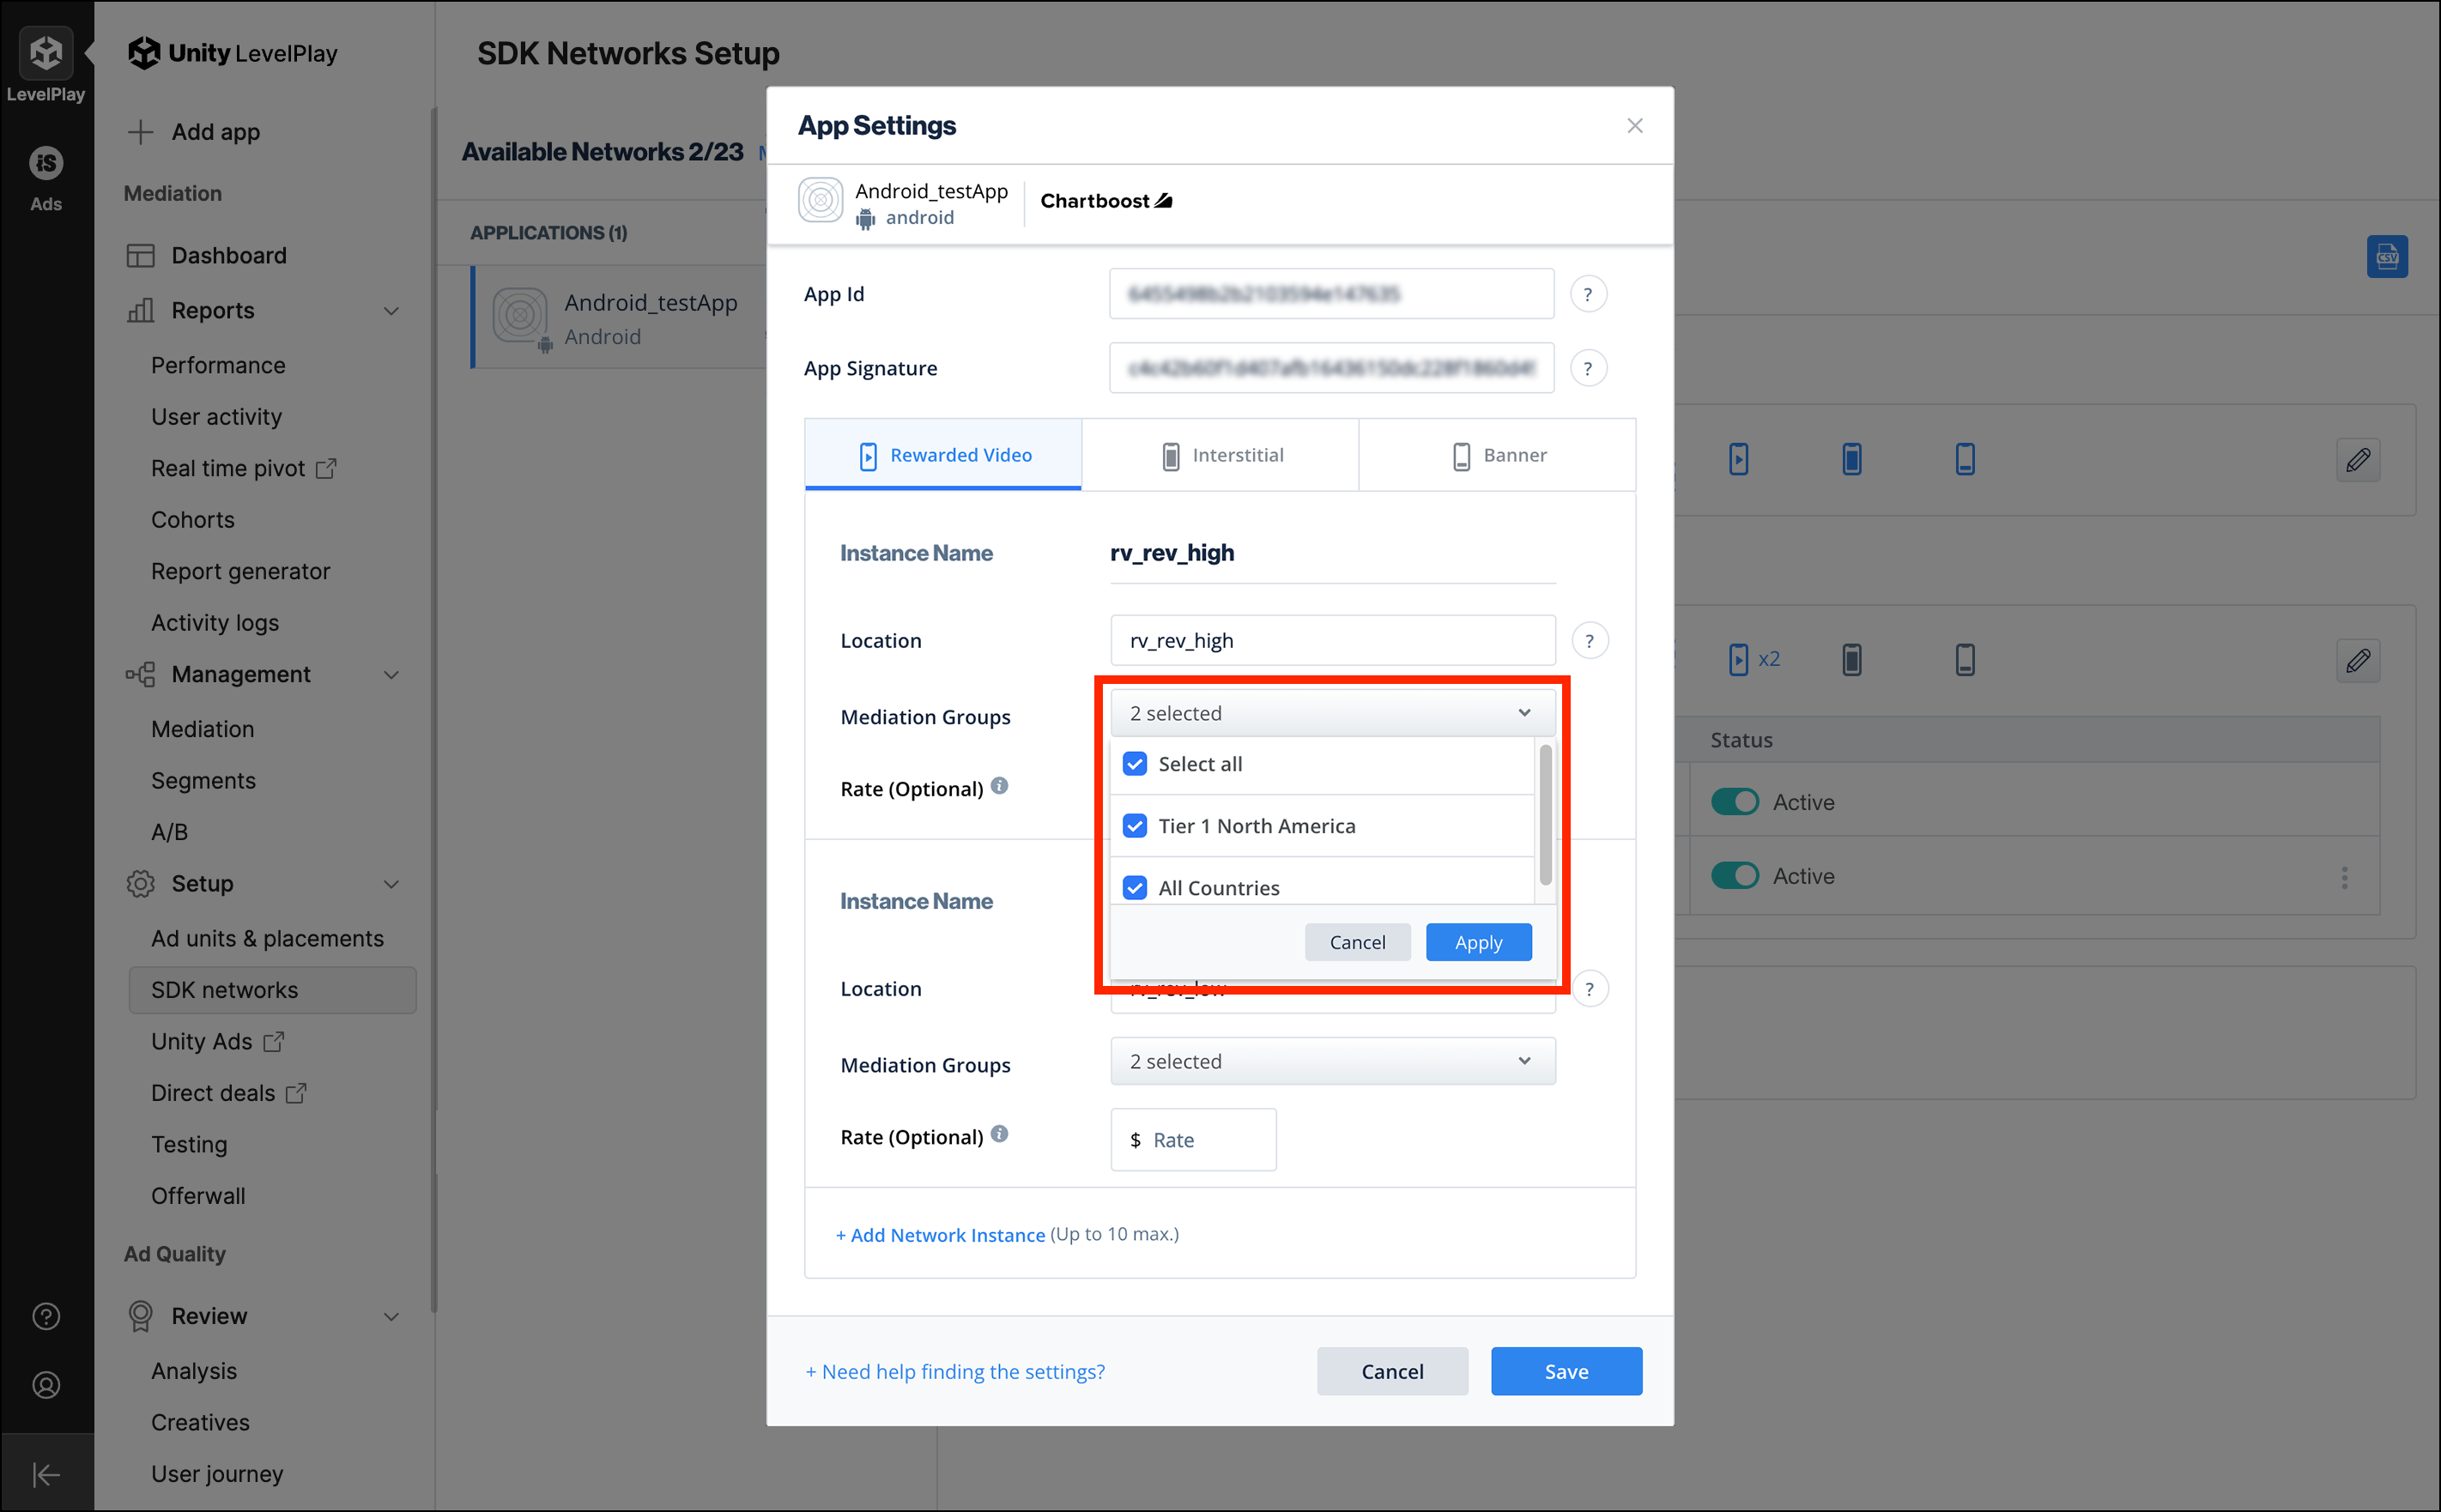
To make sure Chartboost instances are included, login to the Unity LevelPlay platform, navigate to Setup > SDK Networks, click on the desired App from the list of Applications, find Chartboost under Non Bidding, then click on the Edit icon.

-
Click on the Mediation Groups dropdown, and check on all the Groups that you would like to include Chartboost instances. This has to be done for each instance. By default, all groups are included.
-
Click on Save when finished.
3. Manually rank and top-rank Chartboost instances 🔗
When you have multiple instances in a Unity LevelPlay Mediation Group, you can then manually rank each instance. Utilize this tool to top-rank Chartboost.
To manually rank instances in a Unity LevelPlay waterfall, login to the Unity LevelPlay platform, and navigate to Management > Mediation.
- Click on the desired App from the Application list.
- Click on the desired Mediation Group in the group(s) list.
- Click on the desired ad type (rewarded video, interstitial, banner).
Note that by default, Unity LevelPlay puts you in the tab for rewarded video.
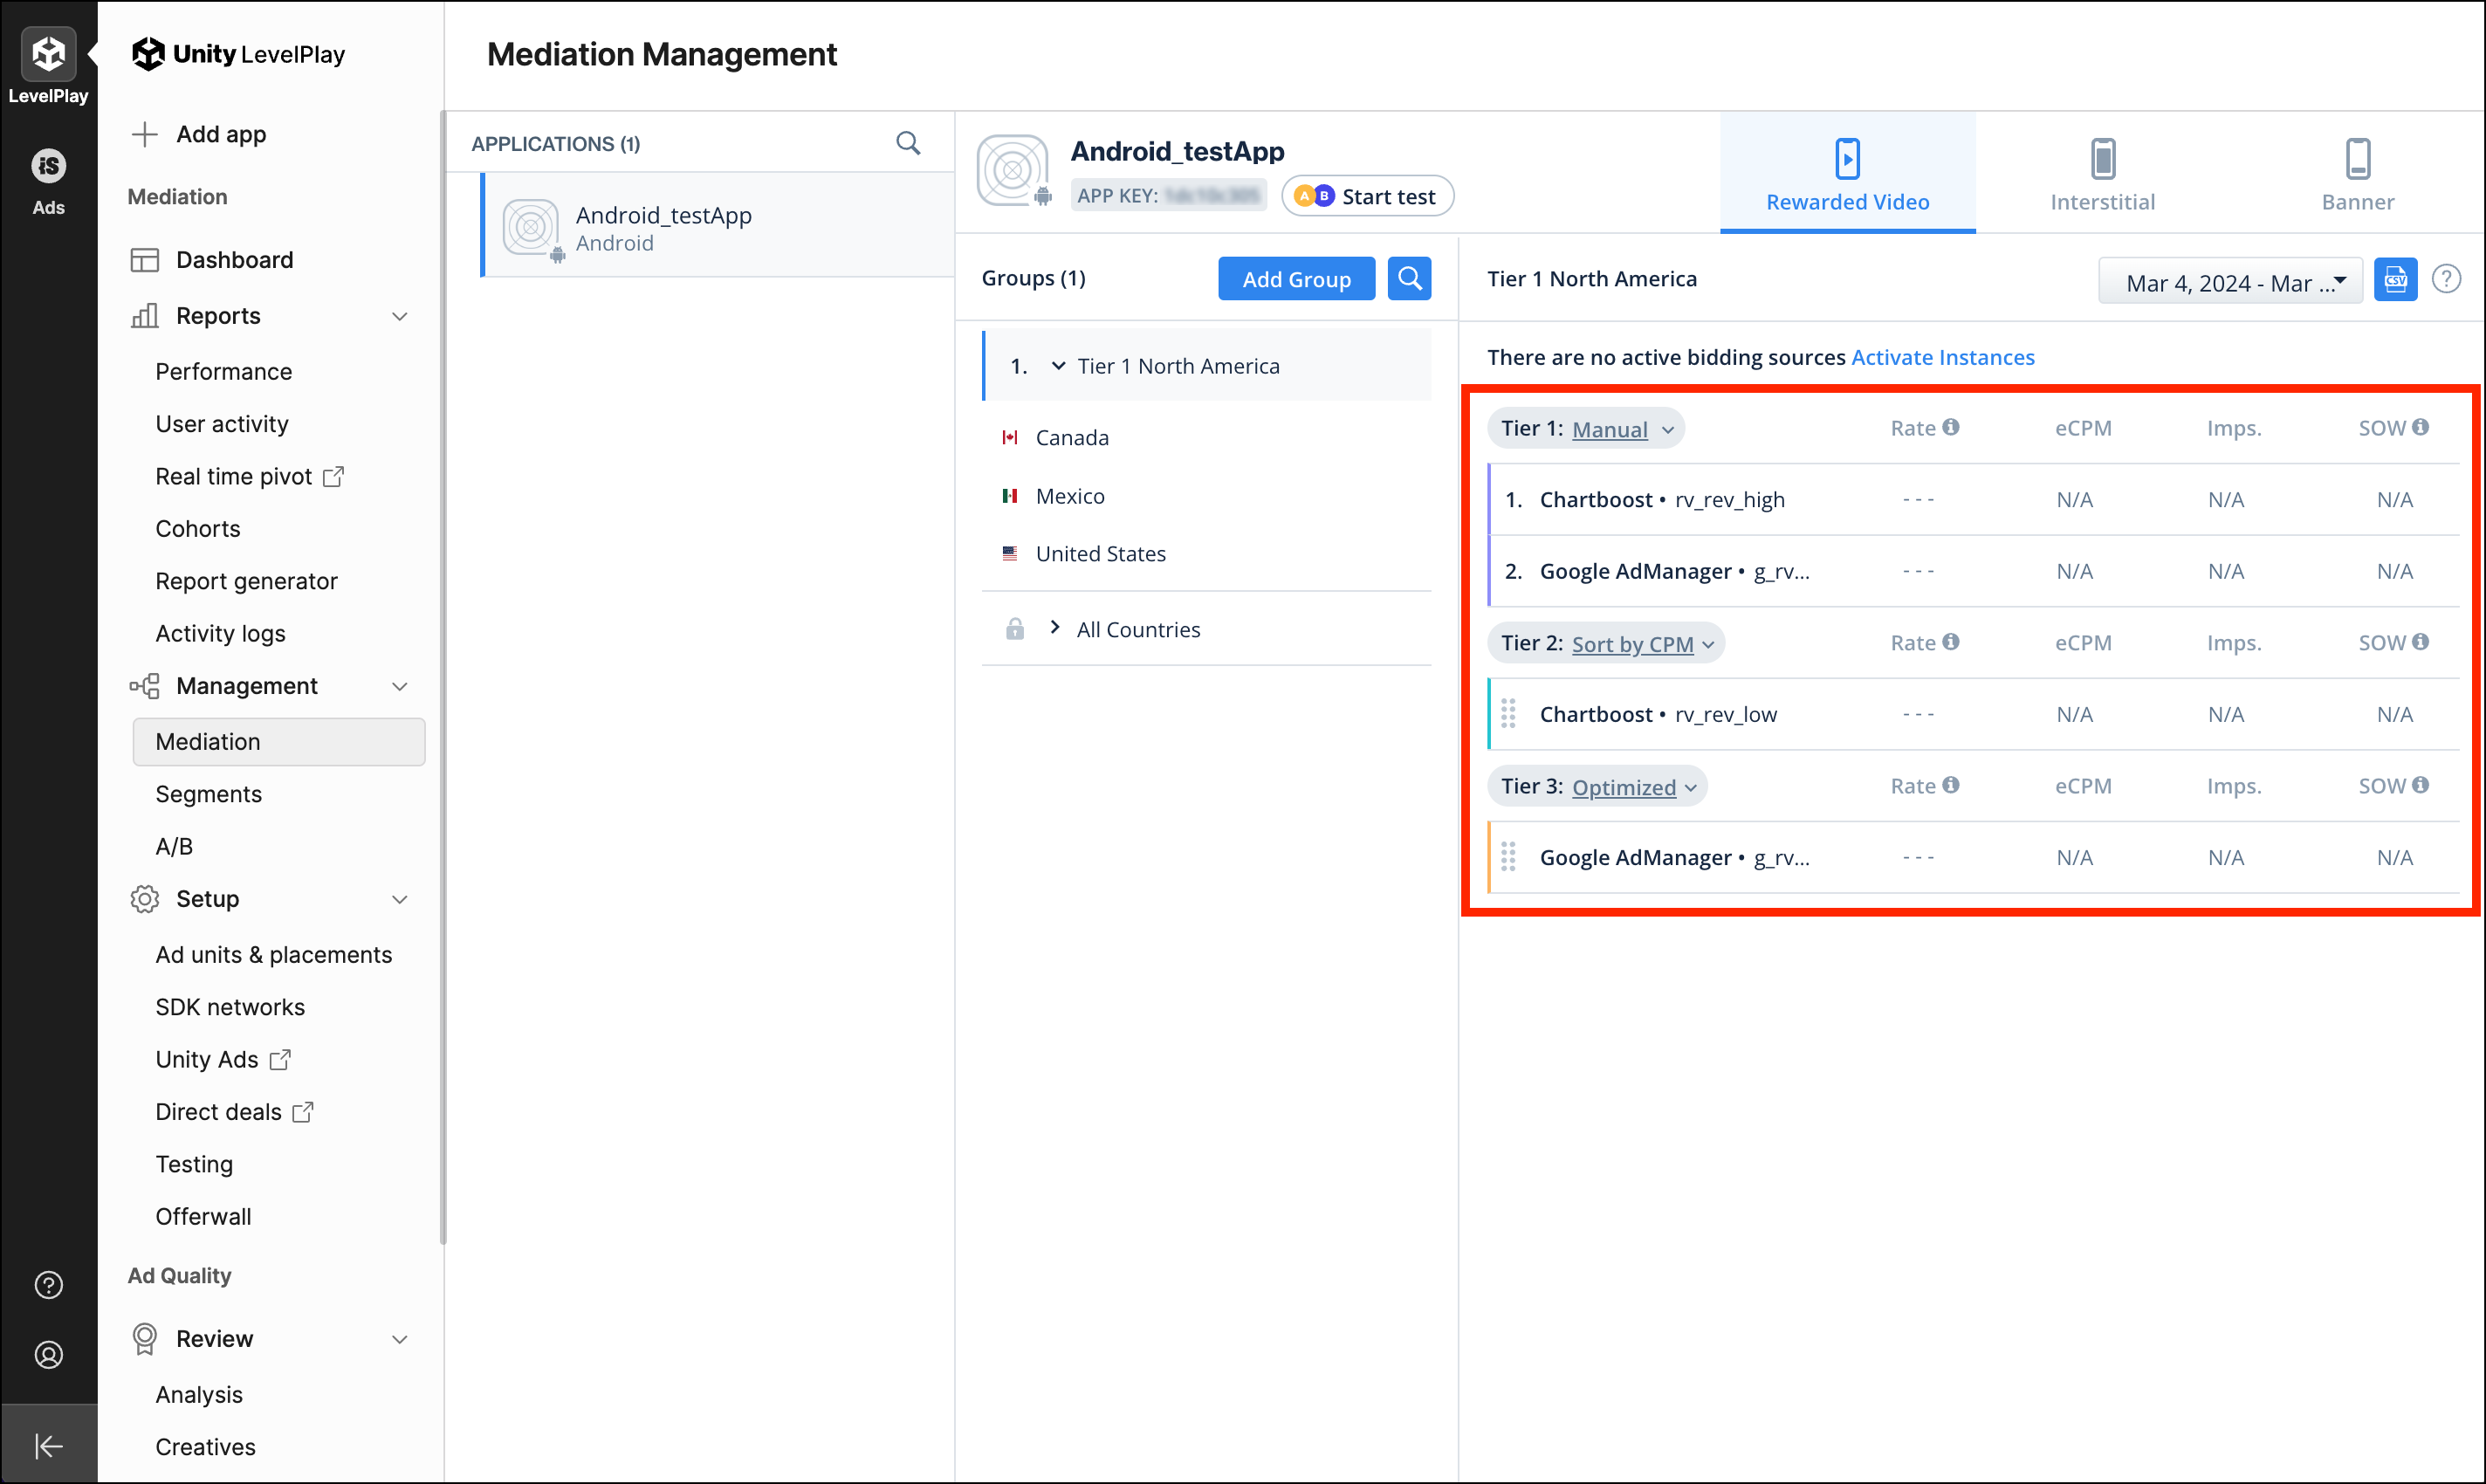
The steps below are using rewarded video as an example but the process is the same for interstitial and banner.
- Set a tier to Manual, then drag and drop Chartboost into that tier.
- Once you’ve positioned an instance of this ad source in this section, your app will serve ads from that ad source prior to any lower tiers, but not before any higher tiers.
- Within manual priority, instances will deliver according to the order you place them, regardless of eCPM or rate.
Make sure you have manually ranked all the Chartboost instances properly. Any instances in lower tiers will be served after higher tiers in a waterfall. Within the Sort by CPM or Optimized option, Unity LevelPlay will pick the highest-ranking eCPM or rate instance at the moment to serve ads.
- If you have multiple Mediation Group(s), you will need to repeat Step 3 for each Mediation Group where Chartboost instances are included.
- To top-rank Chartboost, drag and drop Chartboost instances to the top of the highest tier.
The ad unit in the Mediation Group(s) will now be able to request ads with multiple instances from Chartboost (top-ranked first).